# Port forward services with KOTS

This topic describes how to add one or more ports to the Replicated KOTS port forward tunnel by configuring the `ports` key in the KOTS Application custom resource.

The information in this topic applies to existing cluster installations. For information about exposing services for Replicated kURL or Replicated Embedded Cluster installations, see [Exposing Services Using NodePorts](kurl-nodeport-services).

## Overview

For installations into existing clusters, KOTS automatically creates a port forward tunnel and exposes the Admin Console on port 8800 where it can be accessed by users. In addition to the 8800 Admin Console port, you can optionally add one or more extra ports to the port forward tunnel.

Adding ports to the port forward tunnel allows you to port forward application services without needing to manually run the `kubectl port-forward` command. You can also add a link to the Admin Console dashboard that points to port-forwarded services.

This can be particularly useful when developing and testing KOTS releases for your application, because it provides a quicker way to access an application after installation compared to setting up an ingress controller or adding a load balancer.

## Port forward a service with the KOTS application `ports` key

To port forward a service with KOTS for existing cluster installations:

1. In a new release, configure the [`ports`](/reference/custom-resource-application#ports) key in the KOTS Application custom resource with details for the target service. For example:

   ```yaml
   apiVersion: kots.io/v1beta1
   kind: Application
   metadata:
     name: my-application
   spec:
     ports:
       - serviceName: my-service
         servicePort: 3000
         localPort: 8888
   ```
   The following table provides more information about how to configure each field:

   <table>
     <tr>
       <td>Field</td>
       <td>Instructions</td>
     </tr>
     <tr>
       <td>`ports.serviceName`</td>
       <td>Add the name of the service. KOTS can create a port forward to ClusterIP, NodePort, or LoadBalancer services. For more information about Kubernetes service types, see [Service](https://kubernetes.io/docs/concepts/services-networking/service/) in the Kubernetes documentation.</td>
     </tr>
     <tr>
       <td>`ports.servicePort`</td>
       <td><p>Add the `containerPort` of the Pod where the service is running. This is the port where KOTS forwards traffic.</p><p>Go templates are not supported in the `localPort` or `servicePort` field. For more information, see [`ports`](/reference/custom-resource-application#ports) in _Application_.</p><ServicePortNote/></td>
     </tr>
     <tr>
       <td>`ports.localPort`</td>
       <td><p>Add the port to map on the local workstation.</p><p>Go templates are not supported in the `localPort` or `servicePort` field. For more information, see [`ports`](/reference/custom-resource-application#ports) in _Application_..</p></td>
     </tr>
   </table>

1. Promote the release to the channel that you use for internal testing, then install in a development environment to test your changes.

    When the application is in a Ready state and the KOTS port forward is running, you will see output similar to the following:

    ```bash
    • Press Ctrl+C to exit
    • Go to http://localhost:8800 to access the Admin Console
    • Go to http://localhost:8888 to access the application
    ```
    Confirm that you can access the service at the URL provided in the KOTS CLI output.

1. (Optional) Add a link to the service on the Admin Console dashboard. See [Add a Link to a Port-Forwarded Service on the Admin Console Dashboard](#add-link) below.

## Add a link to a port-forwarded service on the Admin Console dashboard {#add-link}

After you add a service to the KOTS port forward tunnel, you can also optionally add a link to the port-forwarded service on the Admin Console dashboard.

To add a link to a port-forwarded service, add the _same_ URL in the KOTS Application custom resource `ports.applicationURL` and Kubernetes SIG Application custom resource `spec.descriptor.links.url` fields. When the URLs in these fields match, KOTS adds a link on the Admin Console dashboard where the given service can be accessed. This process automatically links to the hostname in the browser (where the Admin Console is being accessed) and appends the specified `localPort`.

To add a link to a port-forwarded service on the Admin Console dashboard:

1. In a new release, open the KOTS Application custom resource and add a URL to the `ports.applicationURL` field. For example:

    ```yaml
   apiVersion: kots.io/v1beta1
   kind: Application
   metadata:
     name: my-application
   spec:
     ports:
       - serviceName: my-service
         servicePort: 3000
         localPort: 8888
         applicationUrl: "http://my-service"
   ```

    Consider the following guidelines for this URL:
      * Use HTTP instead of HTTPS unless TLS termination takes place in the application Pod.
      * KOTS rewrites the URL with the hostname in the browser during deployment. So, you can use any hostname for the URL, such as the name of the service. For example, `http://my-service`. 

1. Add a Kubernetes SIG Application custom resource in the release. For example:

    ```yaml
    # app.k8s.io/v1beta1 Application Custom resource

    apiVersion: app.k8s.io/v1beta1
    kind: Application
    metadata:
      name: "my-application"
    spec:
      descriptor:
        links:
          - description: Open App
            # url matches ports.applicationURL in the KOTS Application custom resource
            url: "http://my-service"
    ```

    1. For `spec.descriptor.links.description`, add the link text that will appear on the Admin Console dashboard. For example, `Open App`.

    1. For `spec.descriptor.links.url`, add the _same_ URL that you used in the `ports.applicationURL` in the KOTS Application custom resource.

1. Promote the release to the channel that you use for internal testing, then install in a development environment to test your changes.

   When the application is in a Ready state, confirm that you can access the service by clicking the link that appears on the dashboard. For example:

   <img alt="Admin Console dashboard with Open App link" src="/images/gitea-open-app.png" width="700px"/>

   [View a larger version of this image](/images/gitea-open-app.png)

## Access port-forwarded services

This section describes how to access port-forwarded services.

### Command line

Run [`kubectl kots admin-console`](/reference/kots-cli-admin-console-index) to open the KOTS port forward tunnel.

The `kots admin-console` command runs the equivalent of `kubectl port-forward svc/myapplication-service <local-port>:<remote-port>`, then prints a message with the URLs where the Admin Console and any port-forwarded services can be accessed. For more information about the `kubectl port-forward` command, see [port-forward](https://kubernetes.io/docs/reference/generated/kubectl/kubectl-commands#port-forward) in the Kubernetes documentation.

For example:

```bash
kubectl kots admin-console --namespace gitea
```
```bash
• Press Ctrl+C to exit
• Go to http://localhost:8800 to access the Admin Console
• Go to http://localhost:8888 to access the application
```

### Admin Console

You can optionally add a link to a port-forwarded service from the Admin Console dashboard. This requires additional configuration. For more information, see [Add a Link to a Port-Forwarded Service on the Admin Console Dashboard](#add-link).

The following example shows an **Open App** link on the dashboard of the Admin Console for an application named Gitea:

<img alt="Admin Console dashboard with Open App link" src="/images/gitea-open-app.png" width="700px"/>

[View a larger version of this image](/images/gitea-open-app.png)

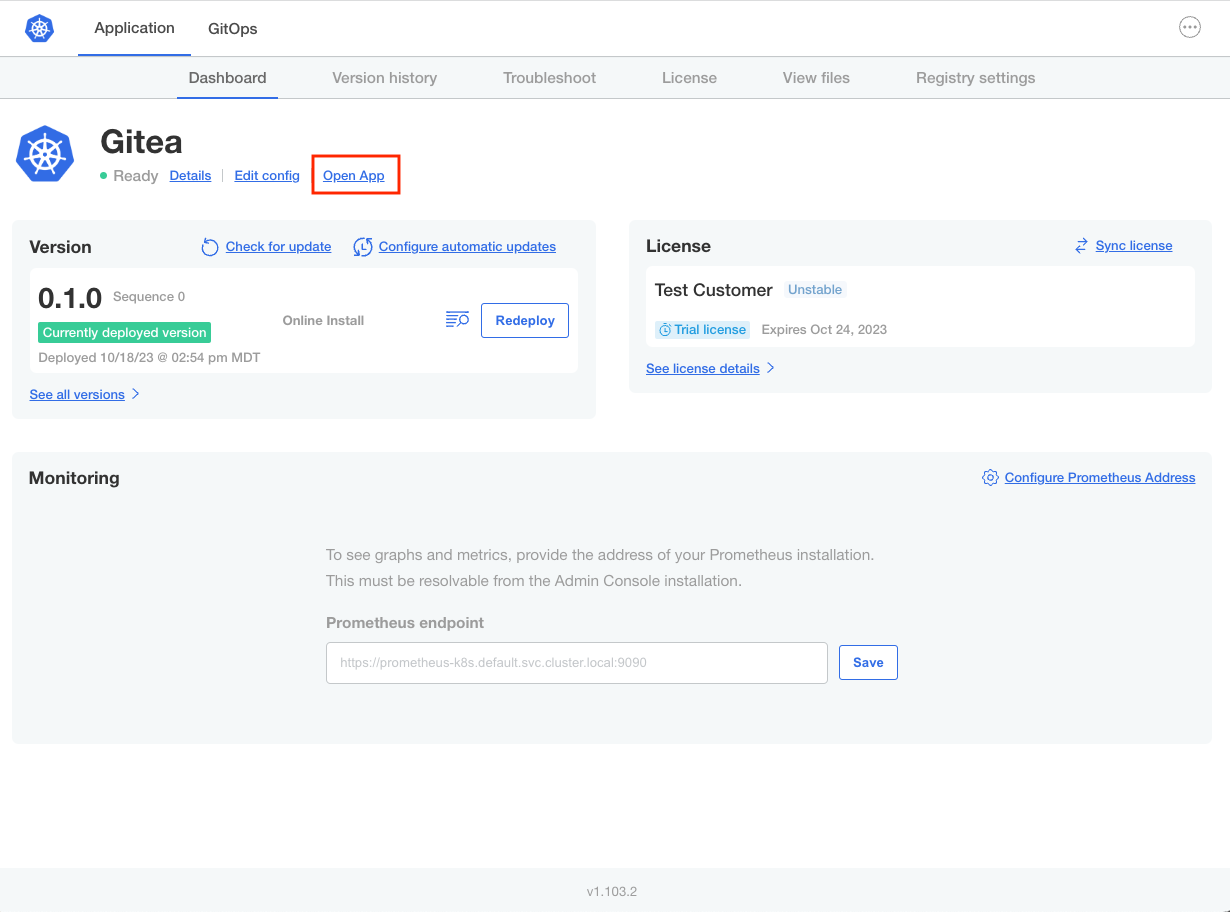
## Example: Nginx application with clusterip and nodeport services

The following example demonstrates how to link to a port-forwarded ClusterIP service for existing cluster KOTS installations. It also shows how to use the `ports` key to add a link to a NodePort service for Embedded Cluster or kURL installations. Although the primary purpose of the `ports` key is to port forward services for existing cluster KOTS installations, it is also possible to use the `ports` key so that links to NodePort services for Embedded Cluster or kURL installations use the hostname in the browser. For information about exposing NodePort services for Embedded Cluster or kURL installations, see [Exposing Services Using NodePorts](kurl-nodeport-services).

To test this example:

1. Add the `example-service.yaml`, `example-deployment.yaml`, `kots-app.yaml`, `k8s-app.yaml`, and `embedded-cluster.yaml` files provided below to a new, empty release in the Vendor Portal. Promote to the channel that you use for internal testing. For more information, see [Manage Releases with the Vendor Portal](releases-creating-releases).

    <Tabs>
    <TabItem value="service" label="example-service.yaml" default>
    <h5>Description</h5>
    <p>The YAML below contains ClusterIP and NodePort specifications for a service named <code>nginx</code>. Each specification uses the <code>kots.io/when</code> annotation with the Replicated <a href="/reference/template-functions-static-context#distribution">Distribution</a> template function to conditionally include the service based on the installation type (existing cluster or Embedded Cluster/kURL cluster). For more information, see <a href="/vendor/packaging-include-resources">Conditionally Including or Excluding Resources</a>.</p>
    <p>As shown below, both the ClusterIP and NodePort <code>nginx</code> services are exposed on port 80.</p>
    <h5>YAML</h5>
    ```yaml
    apiVersion: v1
    kind: Service
    metadata:
      name: nginx
      labels:
        app: nginx
      annotations:
        kots.io/when: 'repl{{ and (ne Distribution "embedded-cluster") (ne Distribution "kurl")}}'
    spec:
      type: ClusterIP
      ports:
        - port: 80
      selector:
        app: nginx
    ---
    apiVersion: v1
    kind: Service
    metadata:
      name: nginx
      labels:
        app: nginx
      annotations:
        kots.io/when: 'repl{{ or (eq Distribution "embedded-cluster") (eq Distribution "kurl")}}'
    spec:
      type: NodePort
      ports:
        - port: 80
          nodePort: 8888
      selector:
        app: nginx
    ```
    </TabItem>
    <TabItem value="deployment" label="example-deployment.yaml" default>
    <h5>Description</h5>
    <p>A basic Deployment specification for the NGINX application.</p>
    <h5>YAML</h5>
    ```yaml
    apiVersion: apps/v1
    kind: Deployment
    metadata:
      name: nginx
      labels:
        app: nginx
    spec:
      selector:
        matchLabels:
          app: nginx
      template:
        metadata:
          labels:
            app: nginx
          annotations:
            backup.velero.io/backup-volumes: nginx-content
        spec:
          containers:
          - name: nginx
            image: nginx
            resources:
              limits:
                memory: '256Mi'
                cpu: '500m'
              requests:
                memory: '32Mi'
                cpu: '100m'
    ```
    </TabItem>
    <TabItem value="kots-app" label="kots-app.yaml" default>
    <h5>Description</h5>
    <p>The KOTS Application custom resource below adds port 80 to the KOTS port forward tunnel and maps port 8888 on the local machine. The specification also includes <code>applicationUrl: "http://nginx"</code> so that a link to the service can be added to the Admin Console dashboard.</p>
    <h5>YAML</h5>
    ```yaml
    apiVersion: kots.io/v1beta1
    kind: Application
    metadata:
      name: nginx
    spec:
      title: App Name
      icon: https://raw.githubusercontent.com/cncf/artwork/master/projects/kubernetes/icon/color/kubernetes-icon-color.png
      statusInformers:
        - deployment/nginx
      ports:
        - serviceName: "nginx"
          servicePort: 80
          localPort: 8888
          applicationUrl: "http://nginx"
    ```
    </TabItem>
    <TabItem value="k8s-app" label="k8s-app.yaml" default>
    <h5>Description</h5>
    <p>The Kubernetes Application custom resource lists the same URL as the `ports.applicationUrl` field in the KOTS Application custom resource (`"http://nginx"`). This adds a link to the port-forwarded service on the Admin Console dashboard that uses the hostname in the browser and appends the specified `localPort`. The label to be used for the link in the Admin Console is "Open App".</p>
    <h5>YAML</h5>
    ```yaml
    apiVersion: app.k8s.io/v1beta1
    kind: Application
    metadata:
      name: "nginx"
    spec:
      descriptor:
        links:
          - description: Open App
            # needs to match applicationUrl in kots-app.yaml
            url: "http://nginx"
    ```
    </TabItem>
    <TabItem value="embedded" label="embedded-cluster.yaml" default>
    <h5>Description</h5>
    <p>To install your application with Embedded Cluster, an Embedded Cluster Config must be present in the release. At minimum, the Embedded Cluster Config sets the version of Embedded Cluster that will be installed. You can also define several characteristics about the cluster.</p>
    <h5>YAML</h5>
    ```yaml
    apiVersion: embeddedcluster.replicated.com/v1beta1
    kind: Config
    spec:
      version: 2.10.0+k8s-1.33
    ```
    </TabItem>
    </Tabs>

1. Install the release into an existing cluster and confirm that the service was port-forwarded successfully by clicking **Open App** on the Admin Console dashboard. For more information, see [Online Installation in Existing Clusters with KOTS](/enterprise/installing-existing-cluster).

1. Install the release on a VM and confirm that you can open the application by clicking **Open App** on the Admin Console dashboard. For more information, see [Online Installation with Embedded Cluster](/enterprise/installing-embedded) or [Online Installation with kURL](/enterprise/installing-kurl).

    :::note
    Ensure that the VM where you install allows HTTP traffic.
    :::

    :::note
    If you used Replicated Compatibility Matrix to create the VM, follow the steps in [Expose Ports on a VM Using the Vendor Portal](/vendor/testing-ingress#expose-ports-vendor-portal) to add these DNS records to the VM:
    * A DNS record with a **Target Port** of **30000** to get a hostname where you can access the Admin Console
    * A DNS record with a **Target Port** of **8888** to get a hostname where you can access the NGINX application
    :::