# Add support for air gap installations
This topic describes how to configure your application releases to support installations in air-gapped environments with little or no outbound internet access. The information in this guide applies to applications installed with Replicated Embedded Cluster or the Helm CLI.
## About air gap installations with Replicated
This section provides an introduction to the Replicated Platform features that support air gap installations.
### Replicated air gap bundles
Air gap bundles contain the images needed to install and run a single release of your application in environments without outbound internet access. For Embedded Cluster installations, the air gap bundle also includes assets needed to install the infrastructure, including the Embedded Cluster installer, k0s, and any Helm extensions.
You need to build an air gap bundle for each release that will be installed in an air-gapped environment. You can build and download air gap bundles from a channel's **Release History** page. You can also enable the **Automatically create airgap builds for newly promoted releases in this channel** setting for each channel. This avoids having to manually build the air gap bundle.
The following shows an example of the **Release History** page for a channel:

[View a larger version of this image](/images/channel-release-history.png)
### HelmChart `builder` key
The `builder` key contains the minimum Helm values required so that the output of `helm template` exposes all container images needed to install the chart in an air-gapped environment.
The Replicated Vendor Portal uses the Helm values that you provide in the `builder` key to run `helm template` on the chart, then parses the output to generate a list of required images for the chart.
The Vendor Portal then uses this list of images to do the following:
* Create the Helm CLI air gap installation instructions that are automatically made available to customers in the [Enterprise Portal](/vendor/enterprise-portal-about) or Download Portal.
* Build the `.airgap` bundle for a release to support air gap installations with a Replicated installer (Embedded Cluster, KOTS, kURL).
* Determine which images to scan and report on in the [Security Center (Alpha)](/vendor/security-center-about).
The `builder` key is required to support the following installation types:
* Air gap installations with a Replicated installer (Embedded Cluster, KOTS, kURL)
* Air gap installations with the Helm CLI
* Online installations with KOTS or kURL where the user will push images to their own local image registry
For more information, see [`builder`](/reference/custom-resource-helmchart-v2#builder) in _HelmChart v2_.
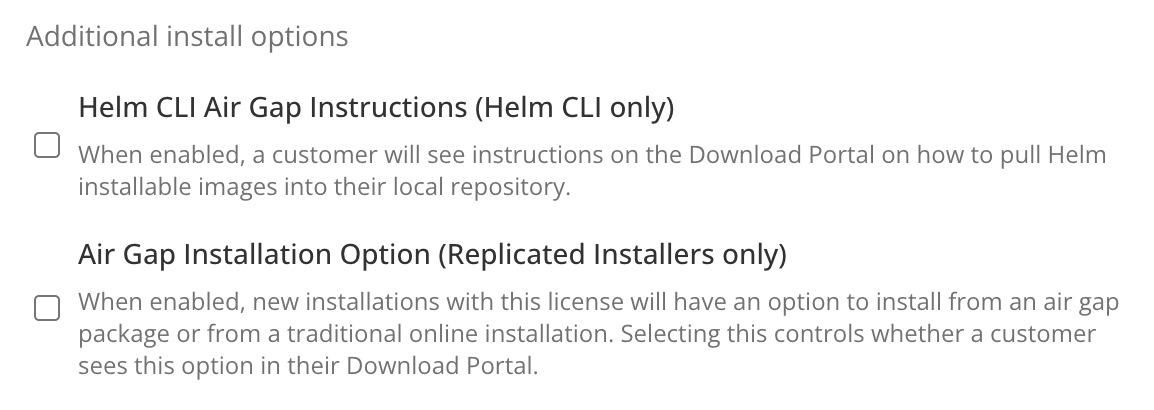
### Air gap customer license entitlements
By default, licenses support online installations only. You can control which of your customers have access to air gap installations by enabling the following built-in license fields:
* **Helm CLI Air Gap Instructions (Helm CLI only)**: When enabled, a customer will see instructions in the Enterprise Portal for how to pull images into their local repository. This entitlement applies to Helm CLI installations only.
* **Air Gap Installation Option (Replicated Installers only)**: When enabled, new installations with this license show an option to install from an air gap bundle. This entitlement applies to Replicated installers only.
Licenses with these air gap entitlements support both air gap and online installations.
The following shows these license fields in the **Additional install options** section of the **Manager customer** page:
 [View a larger version of this image](/images/air-gap-license-entitlements.png)
### Air-gapped environments with Compatibility Matrix
You can change the network policy of environments created with Replicated Compatibility Matrix to `airgap` to block outbound network requests. This allows you to simulate air-gapped environments where you can test your releases. For more information, see [Create air-gapped environments](/vendor/testing-how-to#air-gap).
The following shows an example of the **Compatibility Matrix > Network Policy** page:

[View a larger version of this image](/images/cmx-network-policy.png)
You can also generate _network reports_ with Compatibility Matrix that capture and log all network events. These reports include details about each network event, including the domain names requested, destination IP Addresses connected to, and the source details. This helps you identify unexpected network calls before deploying to an air-gapped environment. For more information, see [Collect and view network reports](/vendor/testing-network-policy).
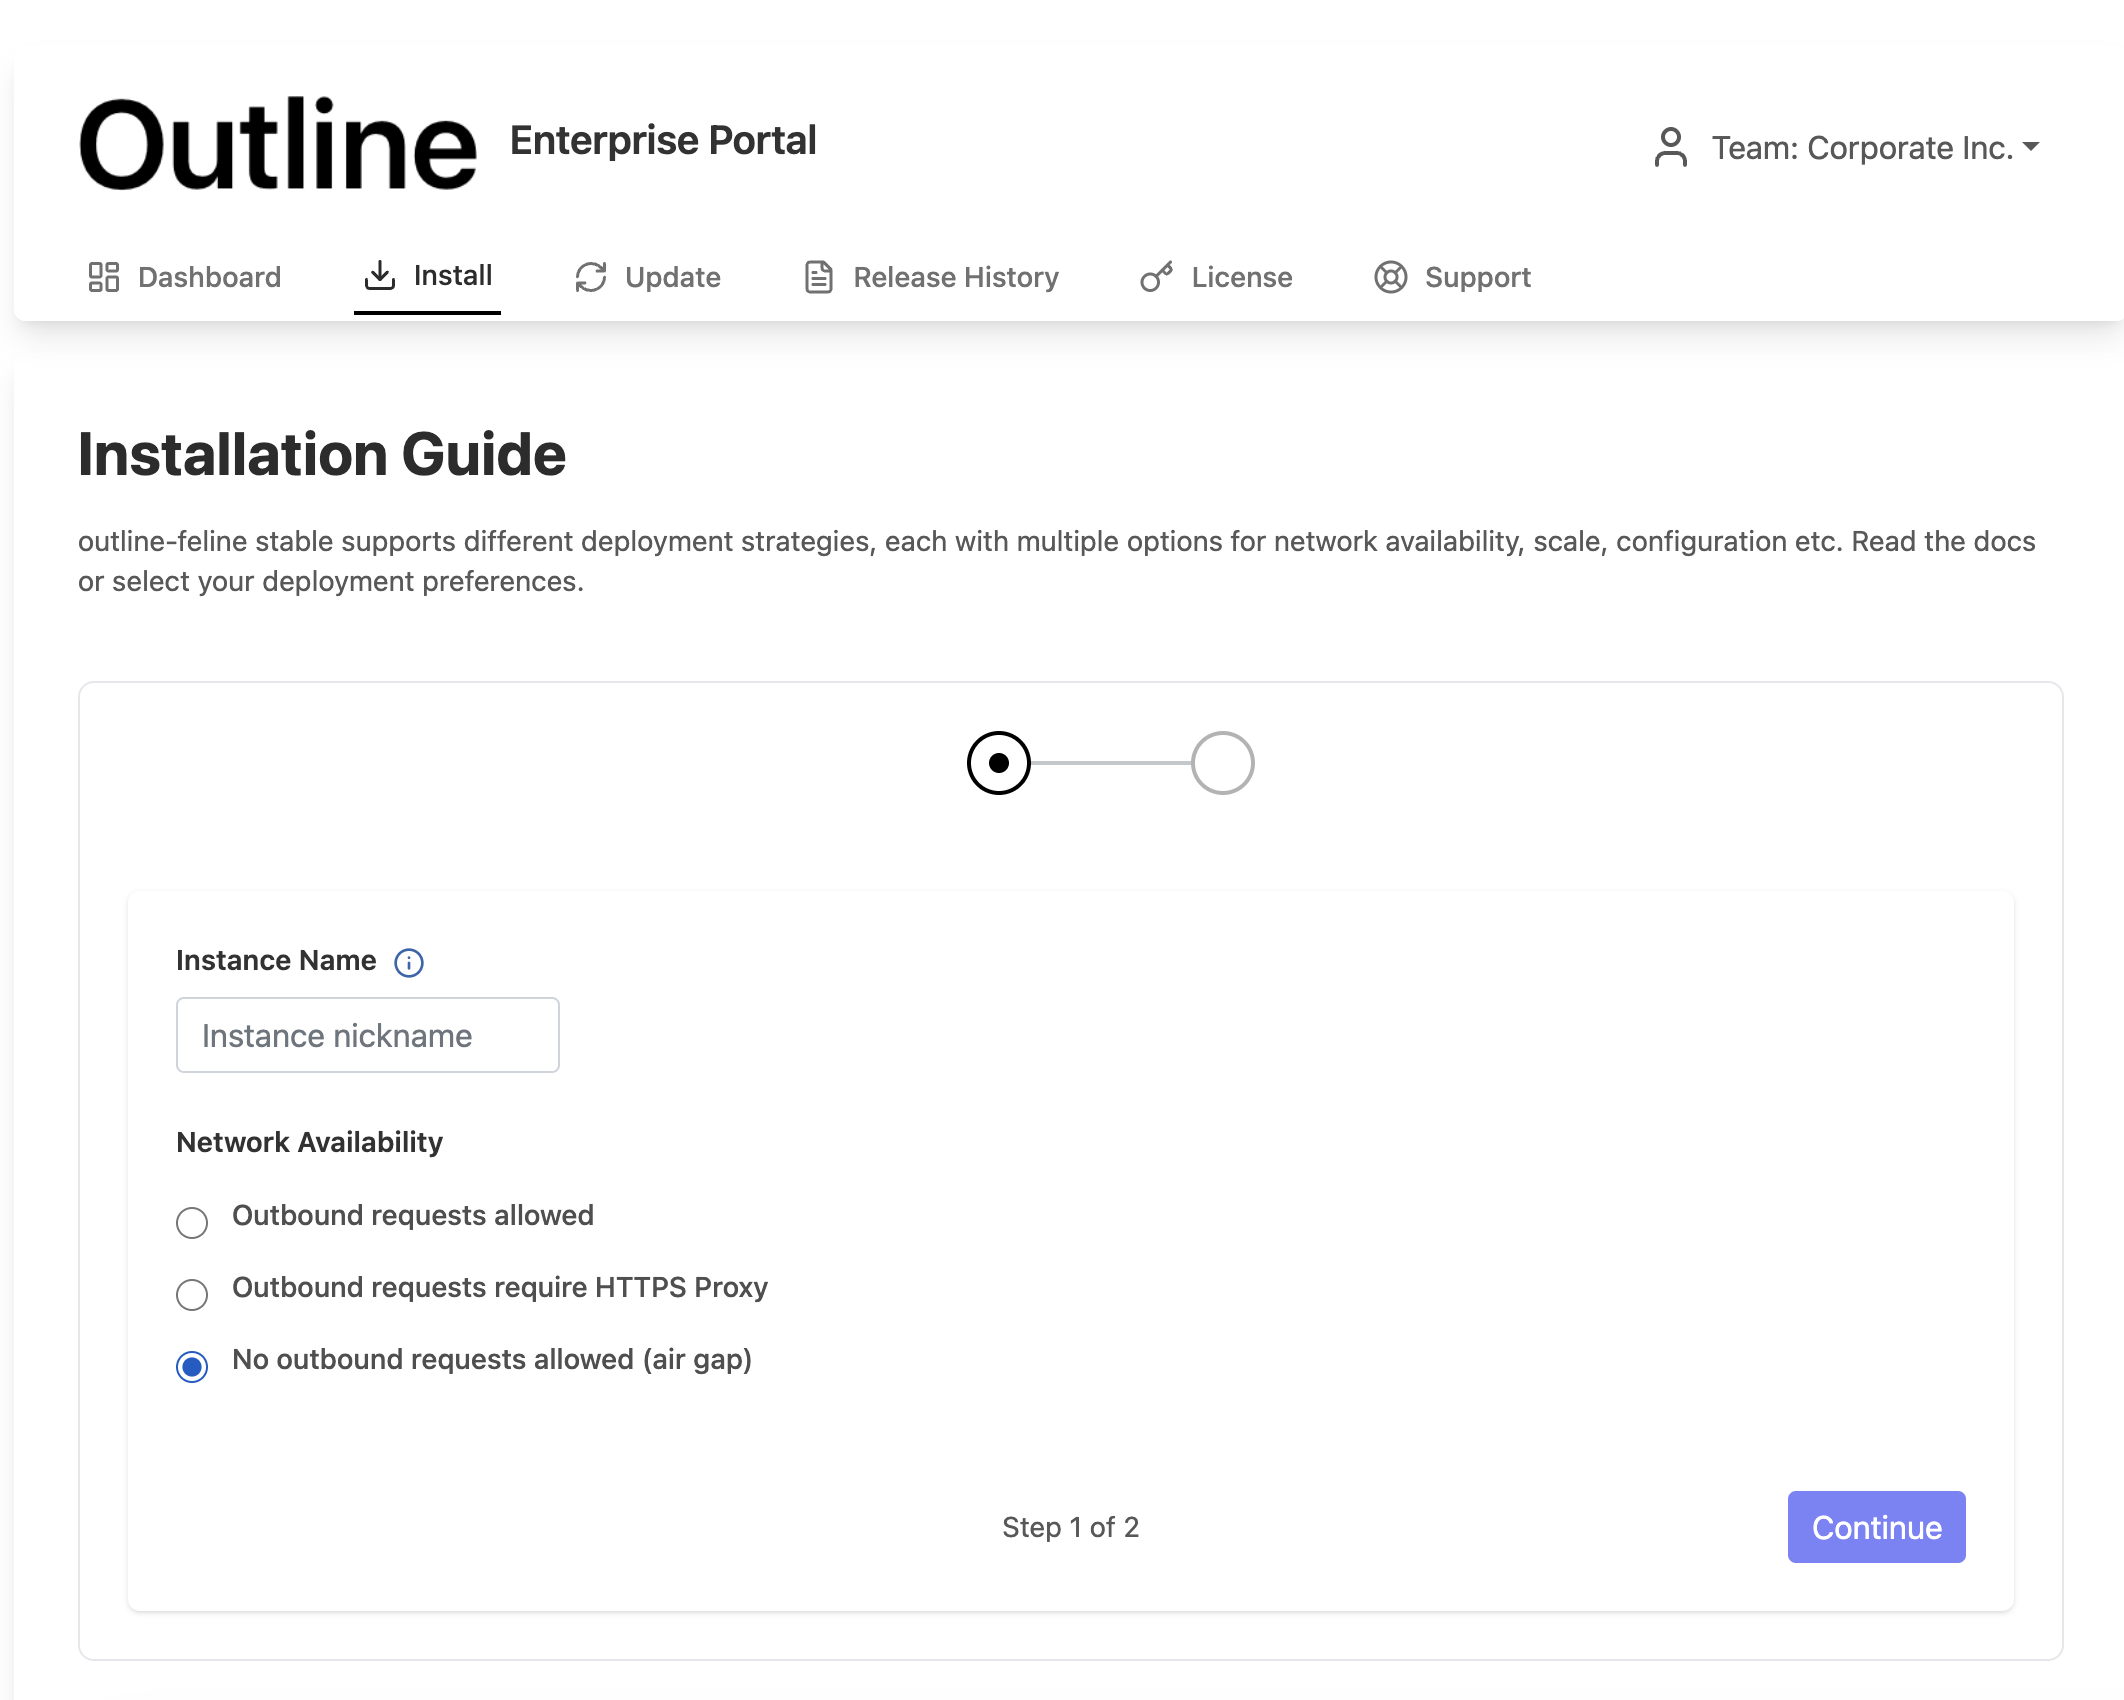
### Air gap install instructions in Enterprise Portal
Your customers can log in to the Enterprise Portal to access instructions for installing in air-gapped environments with the Helm CLI or Embedded Cluster. The Enterprise Portal automatically generates these instructions based on the customer's license entitlements.
For more information about customizing and using the Enterprise Portal, see [About the Enterprise Portal](/vendor/enterprise-portal-about).
From the Enterprise Portal's **Installation Guide**, customers with the air gap license entitlement can choose their **Network Availability** to proceed with an online installation, installation behind an HTTPS proxy, or an air gap installation:
[View a larger version of this image](/images/air-gap-license-entitlements.png)
### Air-gapped environments with Compatibility Matrix
You can change the network policy of environments created with Replicated Compatibility Matrix to `airgap` to block outbound network requests. This allows you to simulate air-gapped environments where you can test your releases. For more information, see [Create air-gapped environments](/vendor/testing-how-to#air-gap).
The following shows an example of the **Compatibility Matrix > Network Policy** page:

[View a larger version of this image](/images/cmx-network-policy.png)
You can also generate _network reports_ with Compatibility Matrix that capture and log all network events. These reports include details about each network event, including the domain names requested, destination IP Addresses connected to, and the source details. This helps you identify unexpected network calls before deploying to an air-gapped environment. For more information, see [Collect and view network reports](/vendor/testing-network-policy).
### Air gap install instructions in Enterprise Portal
Your customers can log in to the Enterprise Portal to access instructions for installing in air-gapped environments with the Helm CLI or Embedded Cluster. The Enterprise Portal automatically generates these instructions based on the customer's license entitlements.
For more information about customizing and using the Enterprise Portal, see [About the Enterprise Portal](/vendor/enterprise-portal-about).
From the Enterprise Portal's **Installation Guide**, customers with the air gap license entitlement can choose their **Network Availability** to proceed with an online installation, installation behind an HTTPS proxy, or an air gap installation:
 [View a larger version of this image](/images/enterprise-portal-install-guide-network-availability.png)
After selecting their network availability, customers can continue to view the installation steps for their target release version:
[View a larger version of this image](/images/enterprise-portal-install-guide-network-availability.png)
After selecting their network availability, customers can continue to view the installation steps for their target release version:
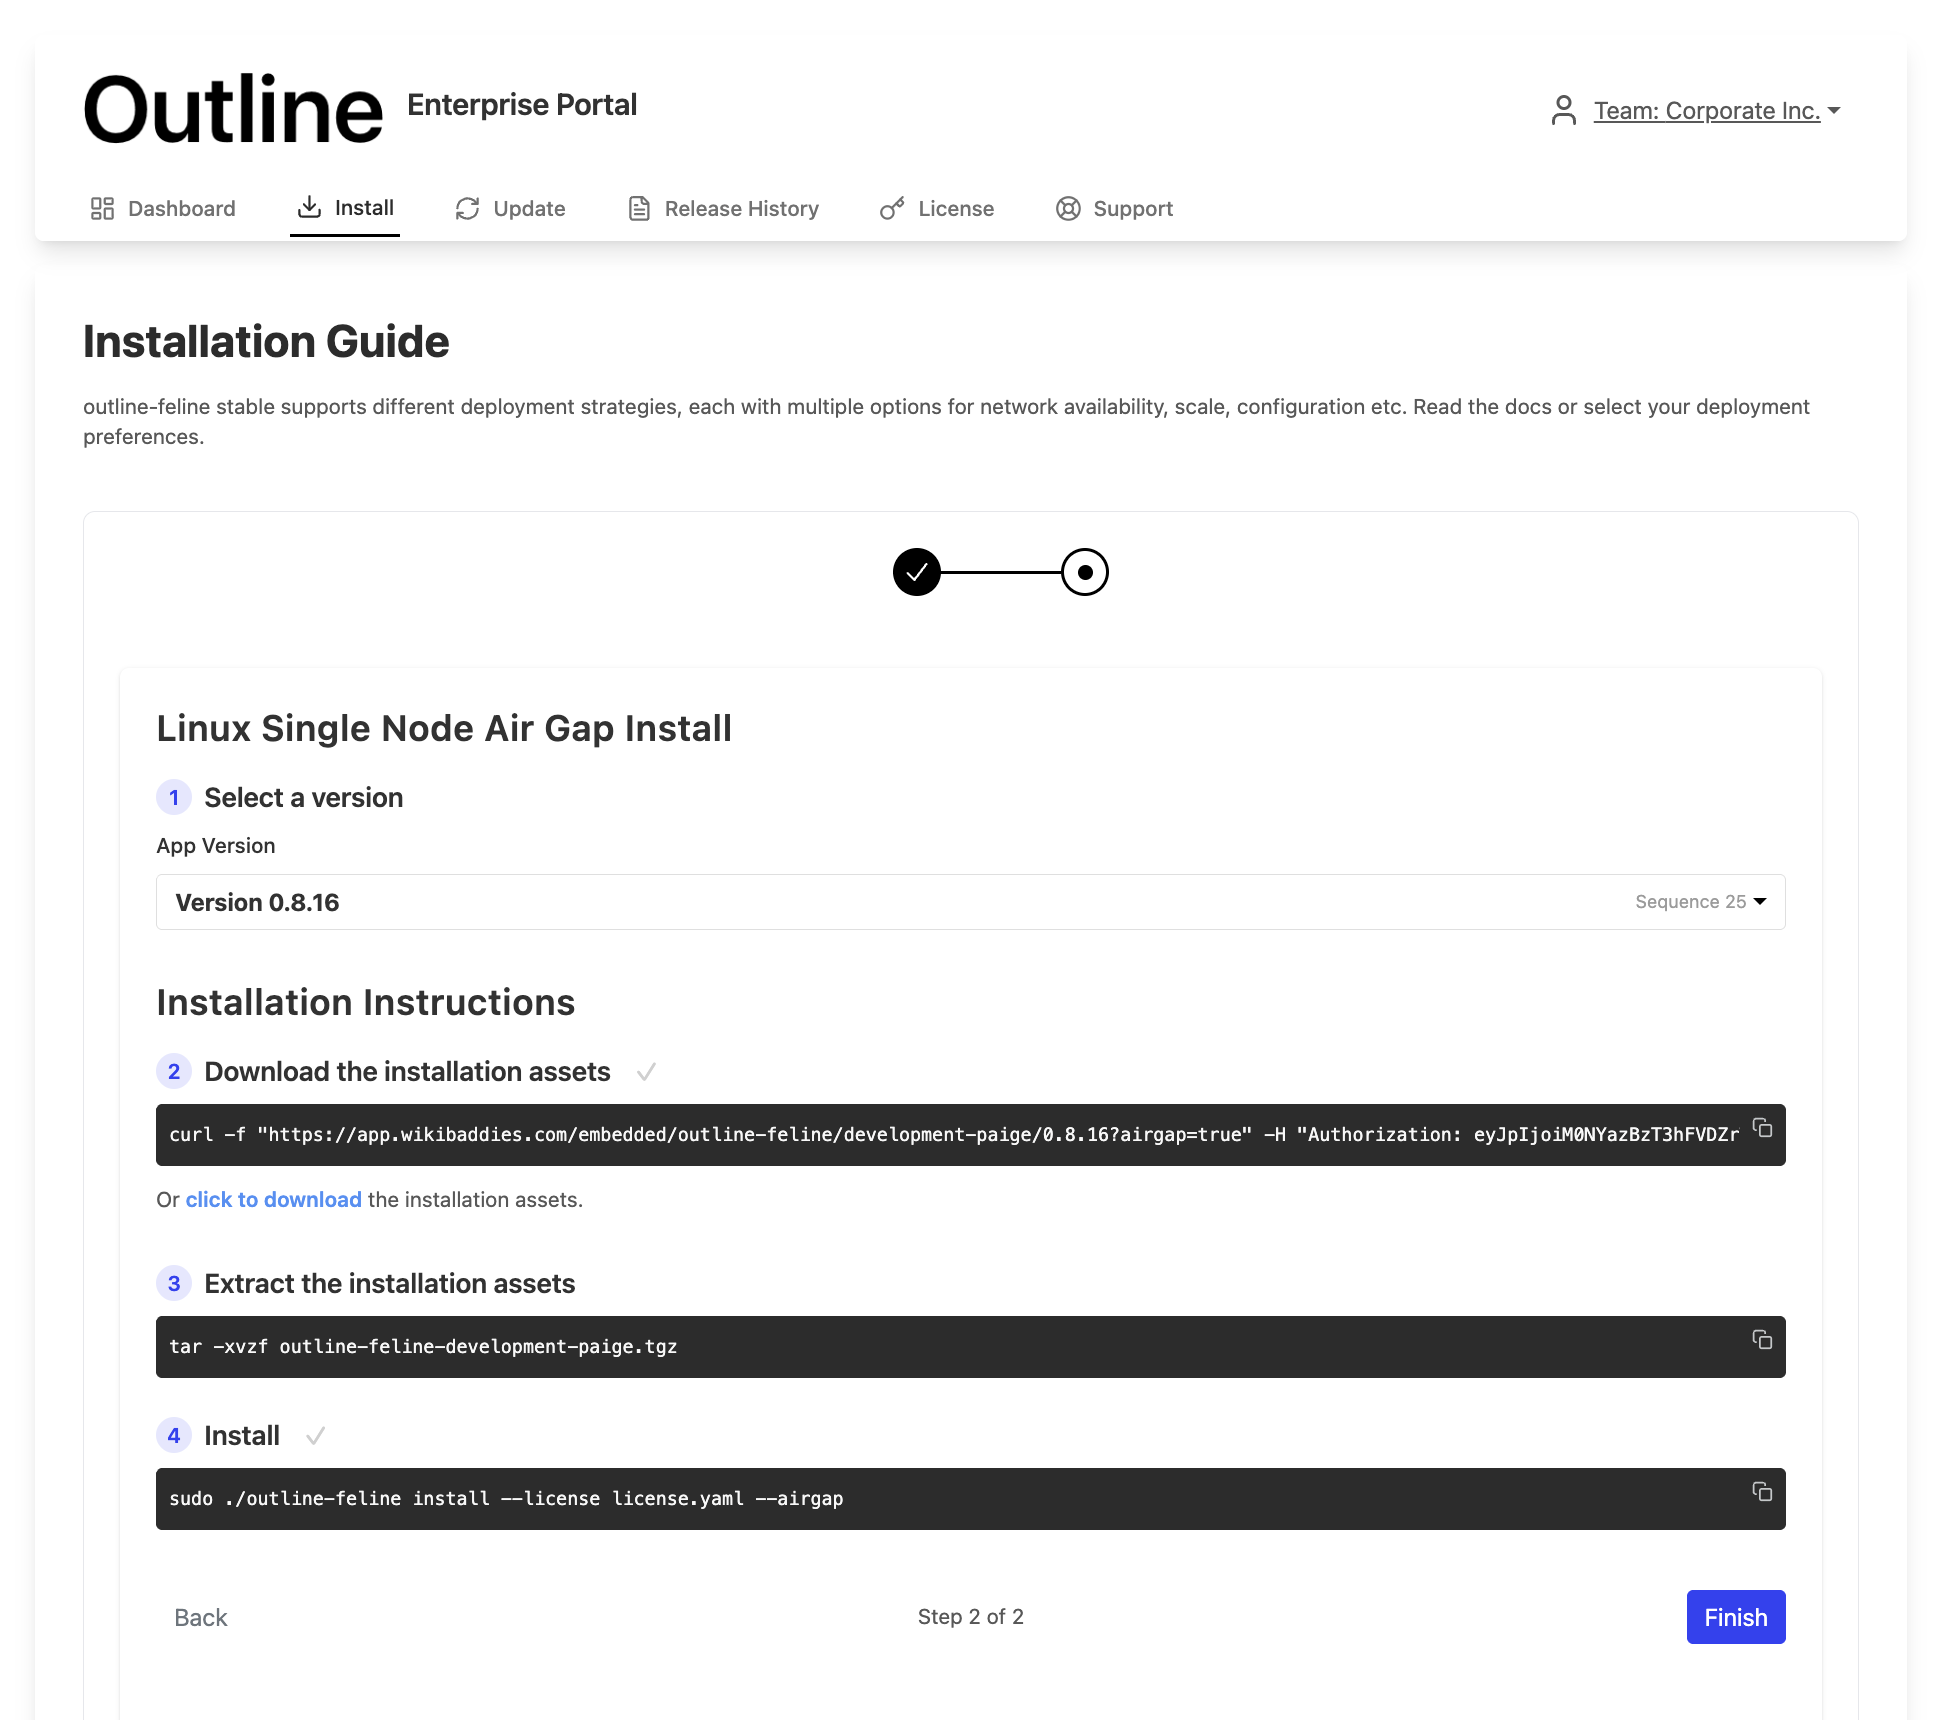 [View a larger version of this image](/images/enterprise-portal-air-gap-install-steps.png)
## Configure releases to support air gap installation
This section describes how to configure releases to support air gap installation. It includes steps for Embedded Cluster v3, Embedded CLuster v2, and Helm CLI installations.
### Prerequisite
These steps assume you already onboarded your application to the platform for online (connected) installations. For more information, see [Onboard to the Replicated Platform](replicated-onboarding).
### Embedded Cluster v3 (Beta)
:::note
Embedded Cluster v3 is Beta. For information about the limitations and known issues of air gap installations with Embedded Cluster v3, see [Limitations and Known Issues](/embedded-cluster/v3/embedded-using#limitations-and-known-issues) in _Configure Embedded Cluster_.
:::
import BuilderKeyDetails from "../../airgap/_builder-key-details-dropdown.mdx"
import CmxAirGapVm from "../../cmx/_air-gap-vm-commands.mdx"
To support air gap installations with Embedded Cluster v3:
1. Configure each HelmChart custom resource's `builder` key. This ensures that all the required and optional images for your application are available in environments without internet access. See [`builder`](/reference/custom-resource-helmchart-v2#builder) in _HelmChart v2_.
[View a larger version of this image](/images/enterprise-portal-air-gap-install-steps.png)
## Configure releases to support air gap installation
This section describes how to configure releases to support air gap installation. It includes steps for Embedded Cluster v3, Embedded CLuster v2, and Helm CLI installations.
### Prerequisite
These steps assume you already onboarded your application to the platform for online (connected) installations. For more information, see [Onboard to the Replicated Platform](replicated-onboarding).
### Embedded Cluster v3 (Beta)
:::note
Embedded Cluster v3 is Beta. For information about the limitations and known issues of air gap installations with Embedded Cluster v3, see [Limitations and Known Issues](/embedded-cluster/v3/embedded-using#limitations-and-known-issues) in _Configure Embedded Cluster_.
:::
import BuilderKeyDetails from "../../airgap/_builder-key-details-dropdown.mdx"
import CmxAirGapVm from "../../cmx/_air-gap-vm-commands.mdx"
To support air gap installations with Embedded Cluster v3:
1. Configure each HelmChart custom resource's `builder` key. This ensures that all the required and optional images for your application are available in environments without internet access. See [`builder`](/reference/custom-resource-helmchart-v2#builder) in _HelmChart v2_.
My chart's default values already expose all images. Do I still need to configure the `builder` key?
If the default values in your Helm chart already expose all the images for air gap installations, then you do not need to configure the `builder` key.
When building an air gap bundle, the Vendor Portal runs `helm template` on each Helm chart to detect which images to include. The bundle includes all images that `helm template` yields.
For many applications, running `helm template` with the default values would not yield all the images required to install. In these cases, vendors can pass the additional values in the `builder` key to ensure that the air gap bundle includes all the necessary images.
1. Configure each HelmChart custom resource to ensure that all image references resolve correctly in both online and air gap installations. You do this in the HelmChart custom resource's [`values`](/reference/custom-resource-helmchart-v2#values) key using the [ReplicatedImageName](/embedded-cluster/v3/template-functions#replicatedimagename) and [ReplicatedImageRegistry](/embedded-cluster/v3/template-functions#replicatedimageregistry) template functions. See the following examples for more information:
Example (Single value for full image name)
For charts that expect the full image reference in a single field, use the [ReplicatedImageName](/embedded-cluster/v3/template-functions#replicatedimagename) template function in the HelmChart custom resource. ReplicatedImageName returns the full image name, including both the repository and registry.
For example:
```yaml
# values.yaml
initImage: proxy.replicated.com/proxy/my-app/docker.io/library/busybox:1.36
```
```yaml
# HelmChart custom resource
apiVersion: kots.io/v1beta2
kind: HelmChart
spec:
values:
initImage: '{{repl ReplicatedImageName (HelmValue ".initImage") true }}'
```
ReplicatedImageName sets `noProxy` to `true` because the image reference value in `values.yaml` already contains the proxy path prefix (`proxy.replicated.com/proxy/my-app/...`)
Example (Separate values for image registry and repository)
If a chart uses separate registry and repository fields for image references, use the [ReplicatedImageRegistry](/embedded-cluster/v3/template-functions#replicatedimageregistry) template function to rewrite the `registry` field. You do not need to template the `repository` field.
```yaml
# values.yaml
postgresql:
image:
# proxy.replicated.com or your custom domain
registry: proxy.replicated.com/proxy/app-slug/docker.io
repository: bitnami/postgresql
```
```yaml
# HelmChart custom resource
apiVersion: kots.io/v1beta2
kind: HelmChart
spec:
values:
image:
registry: '{{repl ReplicatedImageRegistry (HelmValue ".image.registry") }}'
```
Example (References to public images)
For public images that don't go through the Replicated proxy registry, set the upstream reference directly in the chart's `values.yaml`. Use `noProxy` so that ReplicatedImageName leaves the reference unchanged in online installations. When you include `noProxy`, ReplicatedImageName still rewrites the image to the local registry in air gap installations.
```yaml
# values.yaml
publicImage: docker.io/library/busybox:1.36
```
```yaml
# HelmChart custom resource
apiVersion: kots.io/v1beta2
kind: HelmChart
spec:
values:
publicImage: '{{repl ReplicatedImageName (HelmValue ".publicImage") true }}'
```
1. In the HelmChart resource that corresponds to the chart where you included the Replicated SDK as a dependency, rewrite the Replicated SDK image registry using the [ReplicatedImageRegistry](/embedded-cluster/v3/template-functions#replicatedimageregistry) template function:
```yaml
# HelmChart custom resource
apiVersion: kots.io/v1beta2
kind: HelmChart
spec:
values:
replicated:
image:
registry: '{{repl ReplicatedImageRegistry (HelmValue ".replicated.image.registry") }}'
```
1. If you added any Helm chart `extensions` in the Embedded Cluster Config, rewrite image references in each extension using either the [ReplicatedImageName](/embedded-cluster/v3/template-functions#replicatedimagename) template function (if the chart uses a single field for the full image reference) or the [ReplicatedImageRegistry](/embedded-cluster/v3/template-functions#replicatedimageregistry) template function (if the chart uses separate fields for registry and repository).
Example (Extension for a Helm chart that you own)
```yaml
# Embedded Cluster Config
apiVersion: embeddedcluster.replicated.com/v1beta1
kind: Config
spec:
extensions:
helmCharts:
- chart:
name: ingress
chartVersion: "1.2.3"
releaseName: ingress
namespace: ingress
values: |
controller:
image:
registry: 'repl{{ ReplicatedImageRegistry (HelmValue ".controller.image.registry") }}'
```
Example (Extension for a third-party Helm chart)
```yaml
# Embedded Cluster Config
apiVersion: embeddedcluster.replicated.com/v1beta1
kind: Config
spec:
extensions:
helmCharts:
- chart:
name: ingress-nginx
chartVersion: "4.11.3"
releaseName: ingress-nginx
namespace: ingress-nginx
values: |
controller:
image:
registry: 'repl{{ ReplicatedImageRegistry "registry.k8s.io" }}'
```
The template functions add the proxy prefix in online installations and rewrite to the local registry in air gap installations.
1. In the [Vendor Portal](https://vendor.replicated.com), go to the channel where you promoted the release to build the air gap bundle. Do one of the following:
* If you enabled the **Automatically create airgap builds for newly promoted releases in this channel** setting for the channel, watch for the build status to complete.
* If automatic air gap builds are not enabled, go to the **Release history** page for the channel and build the air gap bundle manually.
1. Create or edit a customer with the **Air Gap Installation Option (Replicated Installers only)** entitlement enabled so that you can test air gap installations. See [Create and Manage Customers](/vendor/releases-creating-customer).
1.
1. Install in your development environment to test. See [Air gap installation with Embedded Cluster](/embedded-cluster/v3/installing-embedded-air-gap).
### Embedded Cluster v2
To support air gap installations with Embedded Cluster v2:
1. If there are any images for your application that are not listed in your Helm chart, list these images in the `additionalImages` attribute of the KOTS Application custom resource. This ensures the air gap bundle for the release includes these images. One common use case for this is applications that use Kubernetes Operators. See [Define Additional Images](/vendor/operator-defining-additional-images).
1. Configure each HelmChart custom resource's `builder` key. This ensures that all the required and optional images for your application are available in environments without internet access. See [`builder`](/reference/custom-resource-helmchart-v2#builder) in _HelmChart v2_.
My chart's default values already expose all images. Do I still need to configure the `builder` key?
If the default values in your Helm chart already expose all the images for air gap installations, then you do not need to configure the `builder` key.
When building an air gap bundle, the Vendor Portal runs `helm template` on each Helm chart to detect which images to include. The bundle includes all images that `helm template` yields.
For many applications, running `helm template` with the default values would not yield all the images required to install. In these cases, vendors can pass the additional values in the `builder` key to ensure that the air gap bundle includes all the necessary images.
1. Configure each HelmChart custom resource to ensure that all image references resolve correctly in both online and air gap installations. You do this in `optionalValues` key using the [HasLocalRegistry](/reference/template-functions-config-context#haslocalregistry), [LocalRegistryHost](/reference/template-functions-config-context#localregistryhost), and [LocalRegistryNamespace](/reference/template-functions-config-context#localregistrynamespace) template functions. These functions return the location of the image in the user's local registry in air gap installations.
**Example:**
```yaml
# HelmChart custom resource
apiVersion: kots.io/v1beta2
kind: HelmChart
metadata:
name: samplechart
spec:
optionalValues:
# Define the conditional statement in the when field
- when: 'repl{{ HasLocalRegistry }}'
values:
postgres:
image:
registry: '{{repl LocalRegistryHost }}'
repository: '{{repl LocalRegistryNamespace }}'/cloudnative-pg/cloudnative-pg
```
1. Configure the HelmChart `optionalValues` key to conditionally rewrite the Replicated SDK image to the user's local registry. The default location for the image used by the Replicated SDK Helm chart is `registry.replicated.com/library/replicated-sdk-image`.
```yaml
# HelmChart custom resource
apiVersion: kots.io/v1beta2
kind: HelmChart
metadata:
name: samplechart
spec:
optionalValues:
# Rewrite Replicated SDK image to local registry
- when: 'repl{{ HasLocalRegistry }}'
values:
replicated:
image:
registry: '{{repl LocalRegistryHost }}'
repository: '{{repl LocalRegistryNamespace }}/library/replicated-sdk-image'
```
1.
1. In the [Vendor Portal](https://vendor.replicated.com), go to the channel where you promoted the release to build the air gap bundle. Do one of the following:
* If you enabled the **Automatically create airgap builds for newly promoted releases in this channel** setting for the channel, watch for the build status to complete.
* If automatic air gap builds are not enabled, go to the **Release history** page for the channel and build the air gap bundle manually.
1. Create or edit a customer with the **Air Gap Installation Option (Replicated Installers only)** entitlement enabled so that you can test air gap installations. See [Create and Manage Customers](/vendor/releases-creating-customer).
1.
1. Install in your development environment to test. See [Install in Air Gap Environments with Embedded Cluster](/embedded-cluster/v2/installing-embedded-air-gap).
### Helm CLI
To support air gap installations with the Helm CLI:
1. For each Helm chart in your release, configure the corresponding HelmChart custom resource [builder](/reference/custom-resource-helmchart-v2#builder) key. In the `builder` key, define the Helm values that `helm template` requires to expose all container images needed to install the chart. This ensures that the Vendor Portal can build the air gap bundle for the release and generate the customer-facing air gap install instructions in the Enterprise Portal.
My chart's default values already expose all images. Do I still need to configure the `builder` key?
If the default values in your Helm chart already expose all the images for air gap installations, then you do not need to configure the `builder` key.
When building an air gap bundle, the Vendor Portal runs `helm template` on each Helm chart to detect which images to include. The bundle includes all images that `helm template` yields.
For many applications, running `helm template` with the default values would not yield all the images required to install. In these cases, vendors can pass the additional values in the `builder` key to ensure that the air gap bundle includes all the necessary images.
1.
1. In the [Vendor Portal](https://vendor.replicated.com), go to the channel where you promoted the release to build the air gap bundle. Do one of the following:
* If you enabled the **Automatically create airgap builds for newly promoted releases in this channel** setting for the channel, watch for the build status to complete.
* If automatic air gap builds are not enabled, go to the **Release history** page for the channel and build the air gap bundle manually.
1. Create or edit a customer with the **Helm CLI Air Gap Instructions (Helm CLI only)** entitlement enabled so that you can test air gap installations. See [Create and Manage Customers](/vendor/releases-creating-customer).
1.
1. Follow the steps in [Install and Update with Helm in Air Gap Environments](/vendor/helm-install-airgap) to test the installation in a development environment.