Upgrade from Embedded Cluster v2
This page describes how to upgrade from Embedded Cluster v2 to Embedded Cluster v3.
It includes information about how to update your application release to support Embedded Cluster v3. It also describes how to upgrade existing installations from Embedded Cluster v2 to v3.
Benefits of Embedded Cluster v3
Embedded Cluster v3 delivers the following improvements over v2. For the release changes required to adopt them, see Comparison to Embedded Cluster v2.
One guided experience from the first step. In v2, cluster infrastructure was set up on the command line before a separate UI handled the application. In v3, a single binary drives cluster configuration, preflight checks, node setup, and application deployment in one wizard. See Embedded Cluster overview.
A smaller footprint for customers to secure. The cluster runs your application and Embedded Cluster's own infrastructure components, with no Replicated management component holding cluster-scoped privileges. The KOTS operator's cluster-scoped RBAC grants and cross-namespace access are not part of a v3 install, which takes them out of a customer's security review. The install and upgrade wizard runs only while an operation is in progress, so no management console runs continuously in the cluster unless a customer opts into the persistent admin console. See Removal of KOTS.
Installs no longer reach out to chart repositories. v3 resolves every Helm extension from a .tgz archive bundled in the release instead of pulling it from an HTTP repository or OCI registry at install time. Installs no longer depend on the customer's network reaching those hosts. See Helm extension charts must be bundled in the release.
Private image pulls work for pods you don't control. In v2, the Replicated pull secret had to be injected into every Pod definition that referenced a proxied image, which meant pods created at runtime by an operator, a Job, or a third-party subchart would fail to pull unless you threaded the secret through. v3 configures the cluster to authenticate to the Replicated proxy registry for all pods, so this is handled regardless of what creates the pod. See Automatic authentication to the Replicated proxy registry.
Support for customer-controlled registries. The cluster can pull every image, your application and the infrastructure components alike, from a single OCI registry that the customer operates. See Install with a customer-managed registry.
The full lifecycle can be automated. Install, upgrade, and node join each run from the CLI or the external API with no console interaction. See Install using the CLI (Headless) and Upgrade using the CLI (headless).
Changes for end users
You can adapt these lists for your own customer communications.
During the upgrade from v2
These apply once, when an existing v2 installation moves to v3.
Customers won't see the v3 release in their Admin Console. Releases that use Embedded Cluster v3 don't appear as available updates in the Embedded Cluster v2 KOTS Admin Console. This is by design, to prevent accidental upgrades. To get the v3 release, customers use the Enterprise Portal or download the binary directly. Plan to communicate this when you promote a v3-enabled release.
The upgrade is one-way and asks for confirmation. The v3 binary detects the existing v2 installation and prompts the user to confirm before it proceeds. There's no path back to v2.
Configuration carries forward. Values the customer already set, such as the application domain, are preserved, so nothing has to be re-entered.
Customers more than one Kubernetes minor version behind need an intermediate release first. Kubernetes supports upgrading only one minor version at a time, and Embedded Cluster blocks an upgrade that would skip one. See Increase the Kubernetes minor version for how to lead customers through the versions in order.
Multi-node clusters upgrade the remaining nodes manually, this one time. Streamed upgrades require every remote node to already be running Embedded Cluster 3.2 or later, and nodes still on v2 do not qualify. The wizard detects this and displays manual instructions for those nodes. The user produces an upgrade bundle on the primary controller, copies it to each remaining node, and runs node upgrade there. Once every node is on v3, later upgrades stream automatically with no copying. See create-upgrade-bundle and node upgrade.
Port 30080/TCP must be open on the node. The Embedded Cluster UI requires it, and it must also be reachable by nodes joining the cluster. Customers upgrading an existing v2 node may need to create a firewall opening for it. If the port is occupied, they can select a different port during installation with --installer-port. See Port requirements.
Multi-node clusters also need port 30081/TCP. The Embedded Cluster daemon API listens on this port and is what lets other nodes join and receive upgrades. Single-node clusters do not need it opened. If the port is occupied, customers can select a different port at install with --api-port. See External API.
On any v3 installation
These are the ongoing differences after the upgrade.
A guided wizard handles install and upgrade. Install and upgrade operations launch a wizard that walks the user through configuration, preflight checks, node setup, and deployment, and closes when the operation finishes. It replaces the KOTS Admin Console that handled these steps in v2.
An always-on console is available when you want one. The persistent admin console runs as an opt-in system service, giving end users a browser dashboard without command-line access. From it they can see available updates, view release notes, trigger an upgrade, upload air gap releases, and generate support bundles. It isn't installed by default, and the initial install and console setup require command-line access.
How customers find out about updates depends on whether the console is installed. With the persistent admin console, available updates appear in the console. Without it, customers get updates from the Enterprise Portal or by running the upgrade command directly. See Perform updates in embedded clusters.
Multi-node clusters upgrade themselves one node at a time. The user runs the upgrade on the primary controller, and its daemon streams the upgrade to each remaining node over the network. Controllers upgrade first, one at a time to preserve etcd quorum, then workers. Nobody copies files between machines or runs commands on the other nodes. If a node can't be reached, or is running a version that predates streamed upgrades, the wizard reports it and shows manual instructions for that node. See Multi-node clusters.
Cluster settings are collected in the wizard. The v3 wizard includes a Set Up page where end users provide cluster-level settings such as proxy configuration. In v2 these were passed as CLI flags at install time.
Config value defaults behave differently in v3. All config values, including those that use spec defaults, are resolved and persisted at install time, and previously persisted values take precedence over new defaults on upgrade. Changing a default field in a later release won't reach existing installations. See Config value defaults are persisted at install time.
Comparison to Embedded Cluster v2
This section describes the key differences between Embedded Cluster v2 and v3.
Removal of KOTS
Embedded Cluster v3 removes Replicated KOTS from the architecture. This reduces the number of dependencies that are running in the cluster, which improves reliability.
The KOTS CLI does not work with Embedded Cluster v3, and there is no KOTS Admin Console. Embedded Cluster v3 replaces it with two interfaces:
- A guided install and upgrade UI that walks end users through configuration, preflight checks, node setup, and application deployment. This UI launches automatically during install and upgrade operations. See Set up the wizard's Configure screen.
- An optional persistent admin console that provides an always-on web dashboard for browser-driven upgrades, air gap release uploads, and support bundle generation without SSH access.
Embedded Cluster v3 still requires the Replicated HelmChart v2 custom resource to process and deploy Helm charts. Embedded Cluster v3 also still uses Replicated custom resources like the Replicated Application and Replicated Config resources to define aspects of the installation experience.
Replicated SDK required for instance status reporting
Because Embedded Cluster v3 removes KOTS, you must include the Replicated SDK in your application for application status informers to report instance status to the Vendor Portal.
Continue to configure status informers in the Replicated Application custom resource. Embedded Cluster v3 passes them to the SDK. For more information, see Enable and understand application status.
Application preflight specs must use v1beta3
Application preflight checks must use API version troubleshoot.sh/v1beta3. Embedded Cluster v3 does not support v1beta2 application preflight specs.
In v3, you package preflight specs outside your Helm charts as a release-level YAML file. Embedded Cluster renders the spec through the Helm template engine at install time, giving your preflight spec access to the full Helm rendering context, including chart values, defaults, and helper functions. Because Embedded Cluster renders the spec through Helm, the spec uses Helm template syntax (not repl{{ }} Replicated template syntax).
v1beta3 supports this model because it treats the spec as Helm template YAML rather than a static Kubernetes resource.
You do not need to migrate host preflight, support bundle, or Redactor specs. The v1beta3 requirement applies only to the Preflight custom resource. HostPreflight, SupportBundle, and Redactor specs continue to work with v1beta2 in Embedded Cluster v3. There is no v1beta3 version of the HostPreflight custom resource. For more information about host preflight checks, see Embedded Cluster host preflight checks. For more information about where redactors live in v3, see Add custom redactors.
Key differences from v1beta2 for application preflight specs:
- The spec lives outside your Helm chart, at the release level. You do not need to wrap it in a Secret or include it in your chart's
templates/directory. - The spec uses Helm template syntax (
{{ .Values.something }},{{ include "helper" . }}) instead ofrepl{{ }}Replicated template syntax. - The spec is not valid YAML before rendering. Standard YAML linters will not work on it directly.
- For releases with multiple Helm charts, you can use
{{ if eq .Chart.Name "my-chart" }}conditionals to gate specific collectors or analyzers to the chart they belong to. Embedded Cluster renders the spec one time per chart in the release, each time in that chart's context. - The connectivity collectors (
http,postgres,mysql,mssql,redis, andclickhouse) run wherever the preflight process runs, which is the host in Embedded Cluster v3, rather than inside the cluster as they did under KOTS. To run these checks from within the cluster, wrap them in arunPodcollector. See Run connectivity checks inside the cluster. - For air gap installations, images referenced by the preflight spec (such as the Troubleshoot image used to run checks inside the cluster) are not automatically included in the air gap bundle and must be added to the Application
additionalImagesfield. See Include preflight images in air gap bundles.
For details about the rendering pipeline and multi-chart examples, see Add preflight checks. For more information about the v1beta3 spec format, see v1beta3 overview in the Troubleshoot documentation.
Package your application with Helm
To use Embedded Cluster v3, package your application as one or more Helm charts. Embedded Cluster v3 does not support Kustomize or Kubernetes manifests.
HelmChart v2 required
Embedded Cluster v3 supports installing Helm charts with a corresponding HelmChart v2 custom resource (API version v1beta2). It does not support HelmChart v1. Extension charts defined in the Embedded Cluster Config do not need a separate HelmChart CR — the extension schema in the Config serves the same purpose.
Helm extension charts must be bundled in the release
In Embedded Cluster v2, Helm extensions defined under extensions.helm.charts were pulled at install time from an HTTP Helm repository or an OCI registry, based on the chartname and version fields (and any repositories listed under extensions.helm.repositories).
Embedded Cluster v3 does not pull extension charts at install time from any source, whether an HTTP Helm repository or an OCI registry. Instead, it resolves each extension chart from a .tgz chart archive that is bundled in the release, matching by chart name and version. The v3 extensions.helmCharts schema has no repository or registry field.
As a result, upgrading a repo-sourced or OCI-sourced v2 extension is not only a change to the Config YAML shape. You must also package the chart as a .tgz archive and include it in the release. For the steps, see Update your release to Embedded Cluster v3 below.
Config value defaults are persisted at install time
In Embedded Cluster v2 (KOTS), only config values explicitly set by the end customer were persisted. Default values from the Config spec were re-evaluated on each release, so changing a default field in a new release would take effect for any field the customer hadn't explicitly set.
In Embedded Cluster v3, all config values, including those using spec defaults, are resolved and persisted at install time. On upgrade, previously persisted values take precedence over new defaults in the release. This means changing a default field in a new release will not take effect on existing installations.
If you have config fields that need to be vendor-controlled and updateable across releases, use the value field on readonly or disabled items instead of default. The value field is re-evaluated from the Config spec on each release.
Automatic authentication to the Replicated proxy registry
If your application uses the Replicated proxy registry, Embedded Cluster v3 configures the cluster to automatically authenticate to the proxy registry for all pods. This means that it's no longer necessary to manually inject a Replicated pull secret using the ImagePullSecretName template function.
Changes to Application custom resource fields
Because Embedded Cluster v3 removes the KOTS Admin Console, several fields in the Application custom resource no longer have a meaningful equivalent in v3. These fields can be safely removed from your Application manifest during the upgrade. If left in place, they are silently ignored.
The following Application spec fields are not used in Embedded Cluster v3:
| Field | Purpose in Embedded Cluster v2 (KOTS) |
|---|---|
allowRollback | Enabled the rollback button in the Admin Console |
graphs | Displayed Prometheus metric graphs in the Admin Console |
minKotsVersion / targetKotsVersion | Gated installations to specific KOTS versions |
requireMinimalRBACPrivileges / supportMinimalRBACPrivileges | Controlled KOTS operator RBAC mode |
proxyPublicImages | Routed public image pulls through the Replicated proxy registry via KOTS |
consoleFeatureFlags | Enabled feature flags in the Admin Console UI |
additionalNamespaces | Granted KOTS cross-namespace RBAC access |
The following Application spec fields are still used in Embedded Cluster v3:
| Field | How it is used in Embedded Cluster v3 |
|---|---|
title | Displayed in the Embedded Cluster install and upgrade wizard header. See Customize the wizard branding. |
icon | Displayed next to the title in the wizard. For air gap installations, use a Base64 encoded image since remote URLs are not accessible. See Customize the wizard branding. |
releaseNotes | Used as the default release notes for the channel release when no notes are provided at promote time. See Include release notes. |
additionalImages | Images listed here are included in air gap bundles, even if not directly referenced in Helm chart templates. |
excludedImages | Images listed here are excluded from air gap bundles. |
ports | Configures port-forward shortcuts in the Embedded Cluster install and upgrade wizard. |
statusInformers | Injected into the Replicated SDK Helm values for instance reporting in the Vendor Portal. Requires the Replicated SDK. |
Update your release to Embedded Cluster v3
To update a release from Embedded Cluster v2 to v3:
-
Remove any standalone Kubernetes manifests or
kustomization.yamlfiles from your release. Embedded Cluster v3 only deploys resources defined in Helm charts. If you need to deploy any resources before Embedded Cluster deploys your application, you can use Helm chartextensionsin the Embedded Cluster Config. -
In your application Helm chart
Chart.yamlfile, add the SDK as a dependency. With Embedded Cluster v3, you must include the SDK to get instance insights from status informers.If your application uses multiple charts, declare the SDK as a dependency of the chart that customers install first. Do not declare the SDK in more than one chart.
# Chart.yamldependencies:- name: replicatedrepository: oci://proxy.replicated.com/libraryversion: 1.19.6For the latest version information for the Replicated SDK, see the replicated-sdk repository in GitHub.
-
If you use the Replicated proxy registry, update your release to remove the ImagePullSecretName template function from your HelmChart
valueskey. Embedded Cluster v3 configures the cluster to automatically authenticate to the proxy registry for all pods, so you don't need to manually inject a pull secret. See the Embedded Cluster v3 steps in Configure your application to use the proxy registry. -
If you support air gap installations, update your image references to use the Embedded Cluster ReplicatedImageName and ReplicatedImageRegistry template functions. This ensures that image references resolve correctly in both online and air gap installations. See Add support for air gap installations.
noteIn Embedded Cluster v3, these template functions replace the LocalImageName, LocalRegistryHost, and LocalRegistryNamespace template functions.
-
Update your application preflight specs to API version
troubleshoot.sh/v1beta3:- Change
apiVersionfromtroubleshoot.sh/v1beta2totroubleshoot.sh/v1beta3. - Move the spec file out of your Helm chart's
templates/directory. In v3, the preflight spec is a release-level file, not part of any chart. - If you wrapped your spec in a Kubernetes Secret (the v1beta2 workaround for chart packaging), remove the Secret wrapper. The spec should be a plain
troubleshoot.sh/v1beta3 Preflightresource. - Replace any
repl{{ }}Replicated template syntax with Helm template syntax. For example, use{{ .Values.image.tag }}instead ofrepl{{ ConfigOption "image_tag" }}. - You do not need to update the API version of support bundle or Redactor specs. They continue to work with
v1beta2in Embedded Cluster v3.
If your release needs to support both KOTS and Embedded Cluster v3 installations during the transition period, include two preflight specs: a
v1beta2spec for KOTS and av1beta3spec for Embedded Cluster v3. KOTS ignores thev1beta3spec, and Embedded Cluster v3 ignores thev1beta2spec. Once you no longer need to support KOTS installations, you can remove thev1beta2spec.For more information about the v1beta3 migration, see Migrate from v1beta2 to v1beta3 in the Troubleshoot documentation.
- Change
-
Ensure that your release has a corresponding HelmChart v2 custom resource for each of your application Helm charts. Extension charts defined in the Embedded Cluster Config do not need a separate HelmChart CR. See HelmChart v2.
-
In your Embedded Cluster Config, update
versionto the latest version of Embedded Cluster v3. You can also optionally increment the Kubernetes version by one minor version.Replace
EC_VERSIONwith the version to install, including the Kubernetes suffix. For example,3.12.0-beta.1+k8s-1.36. Each entry in the Embedded Cluster v3 release notes lists the full version strings available for that release.Example:
apiVersion: embeddedcluster.replicated.com/v1beta1kind: Configspec:version: EC_VERSION -
Update any existing Helm extensions to the v3
extensions.helmChartsformat. Seeextensions.Because Embedded Cluster v3 resolves extension charts from bundled
.tgzarchives rather than pulling them from a repository or registry (see Helm extension charts must be bundled in the release), updating the Config YAML is not sufficient on its own. For each Helm extension you defined in v2:-
Pull the chart to a local
.tgzarchive at the version you want to install.For a chart hosted in an HTTP Helm repository (for example, a v2
chartnamesuch asingress-nginx/ingress-nginx):helm repo add ingress-nginx https://kubernetes.github.io/ingress-nginxhelm repo updatehelm pull ingress-nginx/ingress-nginx --version 4.11.3For a chart hosted in an OCI registry (for example, a v2
chartnamesuch asoci://quay.io/jetstack/charts/cert-manager):helm pull oci://quay.io/jetstack/charts/cert-manager --version 1.19.2 -
Add the resulting
.tgzarchive to your release. -
Reference the chart in the Embedded Cluster Config under
extensions.helmCharts, using achart.nameandchart.chartVersionthat match the packaged archive'sChart.yaml.
Example Config:
apiVersion: embeddedcluster.replicated.com/v1beta1kind: Configspec:extensions:helmCharts:- chart:name: ingress-nginxchartVersion: "4.11.3"releaseName: ingress-nginxnamespace: ingress-nginxvalues:controller:service:type: NodePortnodePorts:http: "80"https: "443"image:digest: ""digestChroot: "" -
-
Promote the release to a development channel that you use for testing.
-
In the VM where you plan to test the installation, create a firewall opening for port 30080/TCP. Embedded Cluster v3 requires that port 30080 is open and available.
-
Test the installation using a development customer.
Upgrade an installation from Embedded Cluster v2 to Embedded Cluster v3
Embedded Cluster supports upgrading existing installations from v2 to v3 without having to reinstall the application. The upgrade uses the same upgrade command as any v3-to-v3 upgrade. The v3 binary automatically detects the v2 installation and handles the upgrade, prompting the user to confirm. Running install on a node with an existing v2 installation is blocked — use upgrade instead.
If your v3 release uses a newer Kubernetes minor version than the customer's v2 installation, the upgrade also upgrades Kubernetes. Kubernetes supports upgrading only one minor version at a time, so Embedded Cluster blocks the upgrade if the customer's Kubernetes version is more than one minor version behind the version in your v3 release.
To avoid this, ensure that customers step through the intermediate Kubernetes minor versions before they upgrade to v3. Replicated recommends that you mark each release that increases the Kubernetes minor version as required so that customers cannot skip it. For more information, see Increase the Kubernetes minor version.
To find out which of your customers are affected, check the Kubernetes version reported by each active instance on the Instances tab for the customer in the Vendor Portal. For more information, see Cluster status in Instance Details. Air gap instances report this data less frequently than online instances, so plan for air gap customers to be further behind than their last reported version shows.
Releases that use Embedded Cluster v3 will not appear as available updates in the Embedded Cluster v2 KOTS Admin Console. This is by design to prevent accidental upgrades. Your customers will need to get the v3 release from the Enterprise Portal or by downloading the binary directly. Plan to communicate this to your customer base when you promote a v3-enabled release.
To upgrade an existing installation to Embedded Cluster v3:
-
Get the customer's Embedded Cluster install instructions from the Vendor Portal or from the Enterprise Portal.
-
For application version, select the release that enables Embedded Cluster v3.
-
SSH into the VM where the Embedded Cluster v2 installation is running.
-
On the VM, run the commands to download and extract the installation assets for the target release. The installation assets include the Embedded Cluster binary, the license file, and the release assets.
-
Run the following command to upgrade using the Embedded Cluster v3 upgrade wizard:
sudo ./APP_SLUG upgrade --license license.yamlWhere
APP_SLUGin the unique application slug. -
When prompted, type
yesto confirm that you want to upgrade to v3.Detected EC v2 installation. This will upgrade the cluster from v2 to v3.This is a one-way upgrade and cannot be undone.Do you want to proceed with the upgrade? (yes/NO): yes -
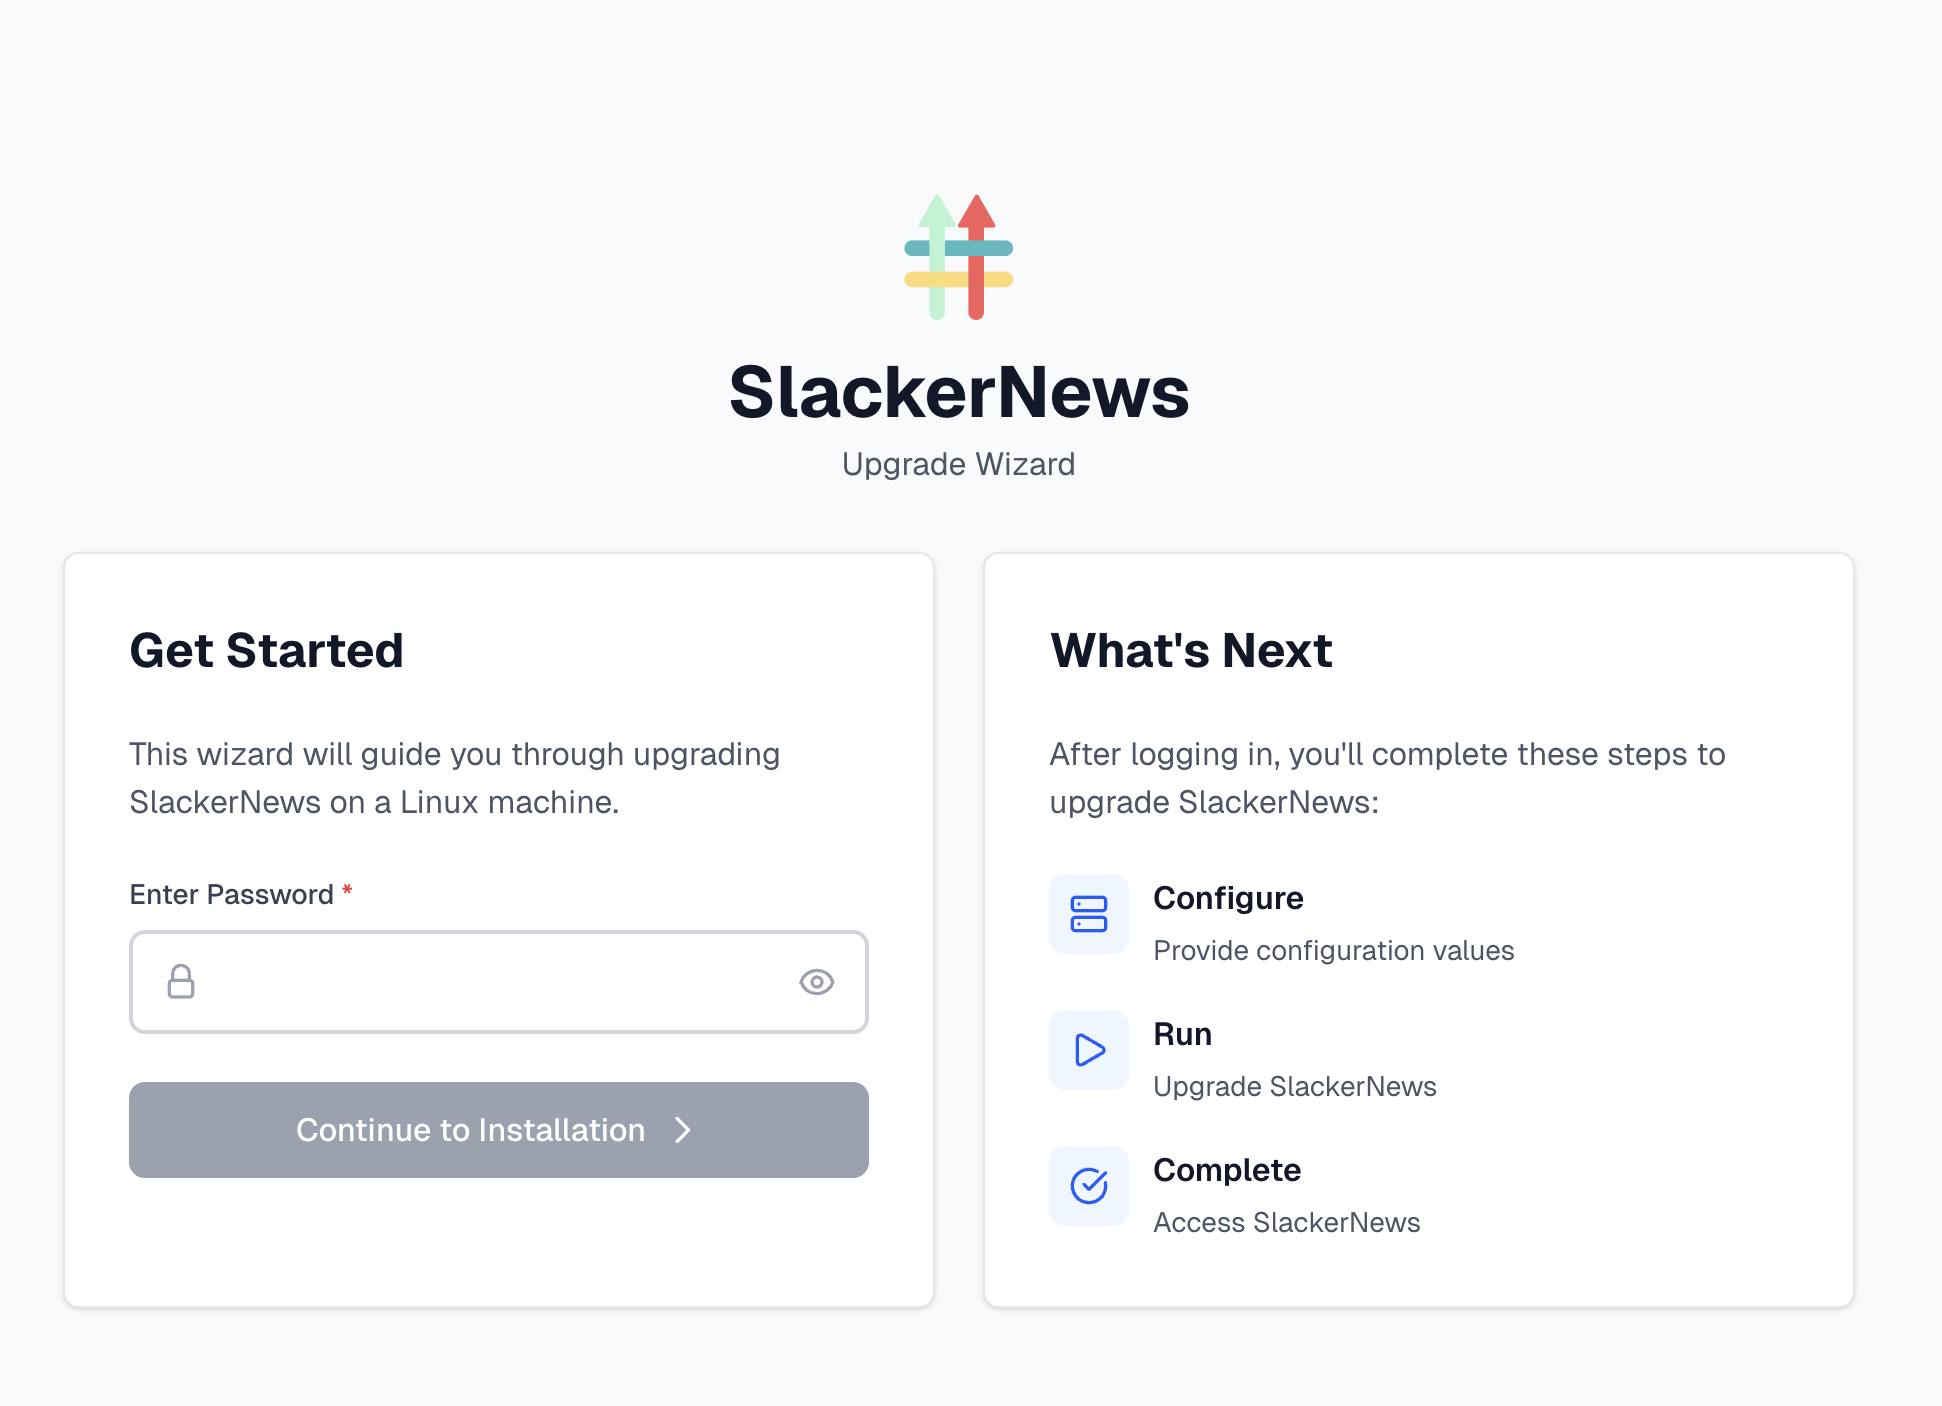
When the upgrade command completes, go to the URL provided to access the upgrade wizard.
Installation started. Connect to the web interface to continue the installation.Open the following URL in your browser:https://kotsadm.default.svc.cluster.local:30080Note: You may see a browser warning for the self-signed certificate.Click "Advanced" > "Proceed" to continue.Press Ctrl+C when the installation is complete to stop the web interface. -
Log in to the upgrade wizard using the existing password for the Admin Console.
-
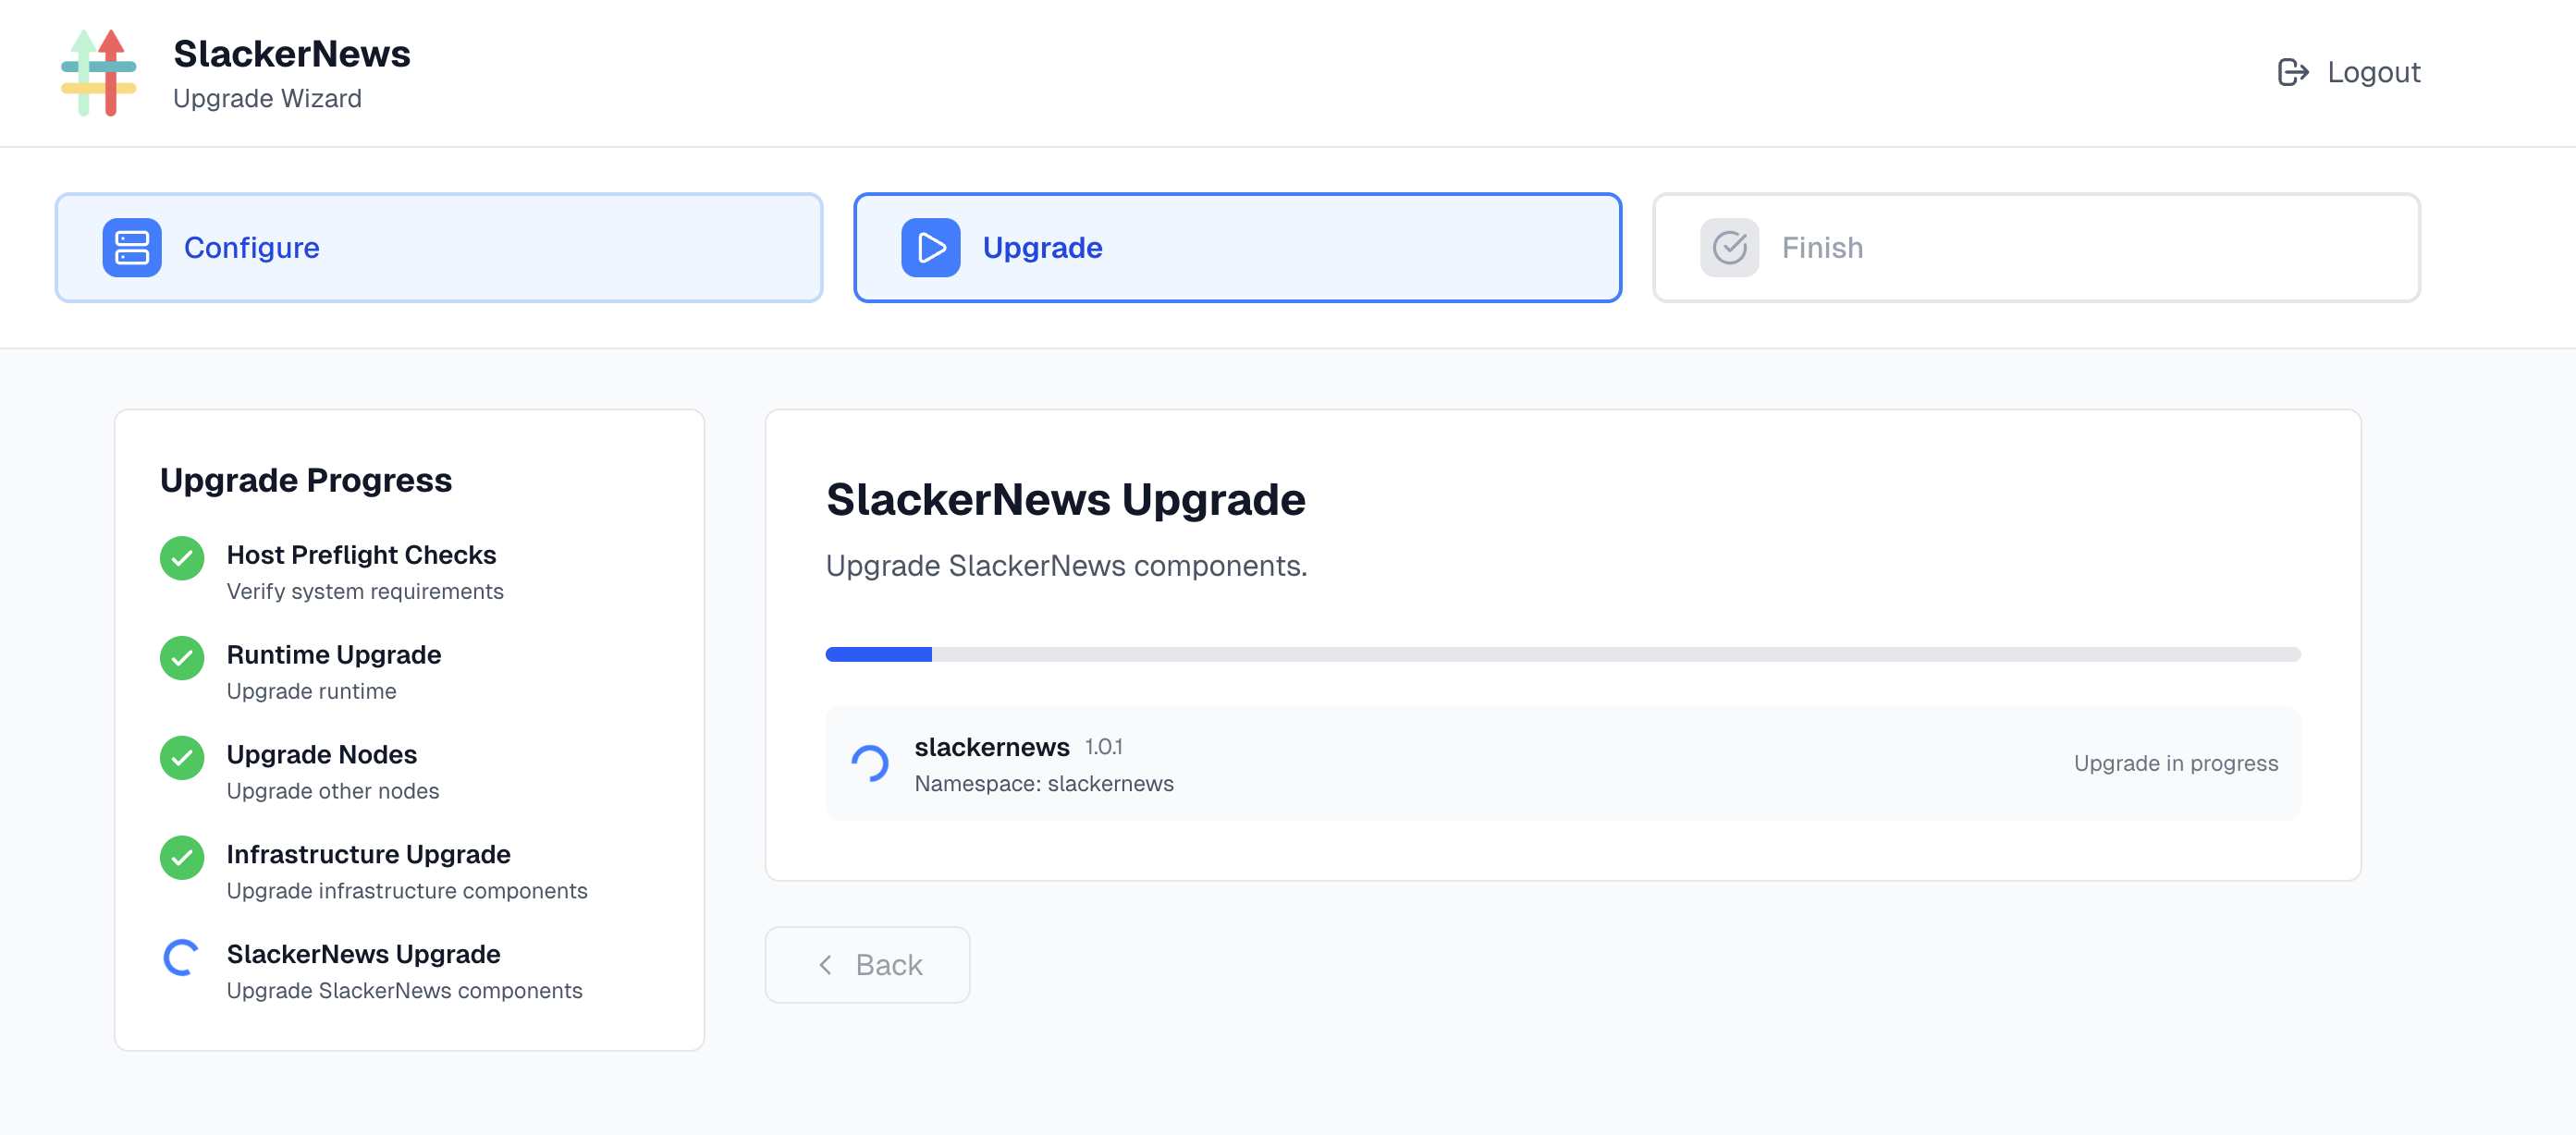
Follow the steps in the wizard to upgrade any other nodes in the cluster, configure the application, and then deploy the application.
-
Press Ctrl+C when the upgrade is complete to close the wizard.