Manage SAML authentication
This topic describes how to enable or disable SAML authentication for the Replicated Vendor Portal.
About using SAML with the Vendor Portal
After starting out with Replicated, most teams grow, adding more developers, support engineers, and sales engineers. Eventually, managing access to the Vendor Portal can become difficult. Replicated supports logging in using SAML, which lets you manage access (provisioning and deprovisioning accounts) through your SAML identity provider.
Using SAML, everyone on your team logs in with their existing usernames and passwords through your identity provider's dashboard. Users do not need to sign up through the Vendor Portal or log in with a separate Vendor Portal account, simplifying their experience.
Provisioning users with SAML
When you enable SAML, you do not add new team members with the email invitation flow. Instead, you create new users in one of the following ways. Just-in-time (JIT) provisioning creates a user account automatically the first time the user logs in through your identity provider.
| Method | How you add a new user | Setup |
|---|---|---|
| SCIM | Your identity provider creates and deactivates users automatically as you assign or remove the Replicated application. | Optional. Requires SAML. See Manage SCIM Provisioning (Beta). |
| IdP-initiated JIT | The user logs in to the Replicated application from your identity provider dashboard, which JIT provisions their account. | Assign the application to users or groups in your identity provider. |
| Domain-redirect JIT | The user enters an email address matching your team's domain on the Vendor Portal SAML login page. The Vendor Portal redirects them to your identity provider, which JIT provisions their account on first login. | Requires that your email domain is listed in your team's SAML configuration. Replicated sets this for you, so contact Support or your account team. This is not self-service. |
| Email invitation | An administrator invites the user by email. | Available only when you do not enable Only allow SAML logins. See Invite members. |
If a user who does not yet exist in your team logs in and sees the error No SAML-enabled teams found for email domain, none of the preceding methods provisioned their account. For more information, see Troubleshooting.
Team IDs for domains with multiple SAML teams
Most teams are the only SAML-enabled team that uses their email domain, and their users are never asked for a team ID. If more than one SAML-enabled team authorizes the same email domain, the Vendor Portal cannot tell which team a first-time user belongs to. The SAML login page then asks the user for a team ID after they enter their email address.
The team ID is a short identifier that Replicated assigns to your team when it configures SAML. There is no self-service way to view it in the Vendor Portal. To get the value so that you can share it with your users, contact Support or your account team.
This team ID is not the same value as the team ID shown on the Team Members page. Entering the value from the Team Members page returns the error Invalid team ID for this domain. For more information, see Troubleshooting.
Users who already have an account in your team are not asked for a team ID, because the Vendor Portal already knows which team they belong to.
Service provider-initiated login
You can start the SAML sign-in flow directly from the Vendor Portal on the SAML login page at https://vendor.replicated.com/login-saml. Based on your team's SAML configuration, the Vendor Portal redirects you to your identity provider to complete authentication.
You can also support IdP-initiated login from your identity provider dashboard. By default, this works only for users who already exist in your team and for users you assign the Replicated application to in your identity provider. To provision new users automatically by email domain, your email domain must be listed in your team's SAML configuration. Replicated sets this for you, so contact Support or your account team. Any email address matching a listed domain is then sent to your identity provider for authentication. For more information, see Provisioning users with SAML.
SCIM
For automated user provisioning and deprovisioning, you can also enable System for Cross-domain Identity Management (SCIM). SCIM requires that you configure SAML first. For more information, see Manage SCIM Provisioning (Beta).
Compatibility with two-factor authentication
If your team has configured SAML authentication, Replicated bypasses two-factor authentication (2FA). You can leave 2FA enabled, but you are not prompted to enter a code when logging in.
Role based access control
Replicated supports Role Based Access Control (RBAC) in the Vendor Portal. To use RBAC with SAML, you must configure policies and add users to the policies by their username. Usernames are the identity of the user in your identity provide (IDP). Typically, this username is the full email address. For more information about configuring RBAC, see Configure RBAC Policies.
Supported SAML providers
Replicated tests several SAML providers, but the service should be compatible with any SAML 2.0 compliant service provider.
Replicated provides full support for the following SAML providers:
- Okta
- OneLogin
- Duo
Configure and enable SAML
Prerequisites
-
To enable SAML in your Vendor Portal account, you must have an Enterprise plan. For access to SAML, you can contact Replicated through Support. For information about the Enterprise plan, see pricing.
-
Download certificates from supported SAML providers: You must retrieve the metadata and x.509 public certificate files from your SAML provider before configuring SAML in the Vendor Portal. The certificate file must be in PEM format.
Configure Okta
You configure the first part of the Vendor Portal and Okta integration in the Okta dashboard. This configuration lets you download the XML Metadata file and x.509 public certificate in PEM format required for the SAML authentication.
This procedure outlines the basic configuration steps, recommended settings, and the specific fields to configure in Okta. For more information about using Okta, see the Okta documentation.
To configure Okta and download the required files:
-
Log in to your Okta Admin dashboard, and click applications.
-
Select Create new app integration, and create a new application as a SAML 2.0 application.
-
Provide a name and icon for the application, such as Replicated Vendor Portal. You can download a high quality Replicated icon here.
-
Click Next.
The Configuring SAML page opens.
-
Click Download Okta Certificate. This downloads your x.509 certificate to provide to Replicated. Save this file to safe location.
-
On this same page, edit the following fields:
Field Name Description Single Sign On URL Set this to https://id.replicated.com/v1/saml.Audience URI (SP Entity ID) Displays on the Vendor Portal SAML authentication tab, and is unique to your team. Name ID Format Change this to EmailAddress. -
Click Next.
-
Select I’m an Okta customer adding an internal app on the final screen, and click Finish.
-
Click Identity provider metadata to download the Metadata.xml file. This likely opens an XML download that you can save by selecting Save Link As… from the context menu.
Next step
Configure and enable SAML in the Vendor Portal. For more information, see Configure SAML.
Configure SAML
When you initially configure SAML, we do not recommend that you disable username/password access at the same time. It is possible, and recommended during testing, to support both SAML and non-SAML authentication on your account simultaneously.
To configure SAML:
-
Log in to the Vendor Portal Team Members page as a user with Admin access.
-
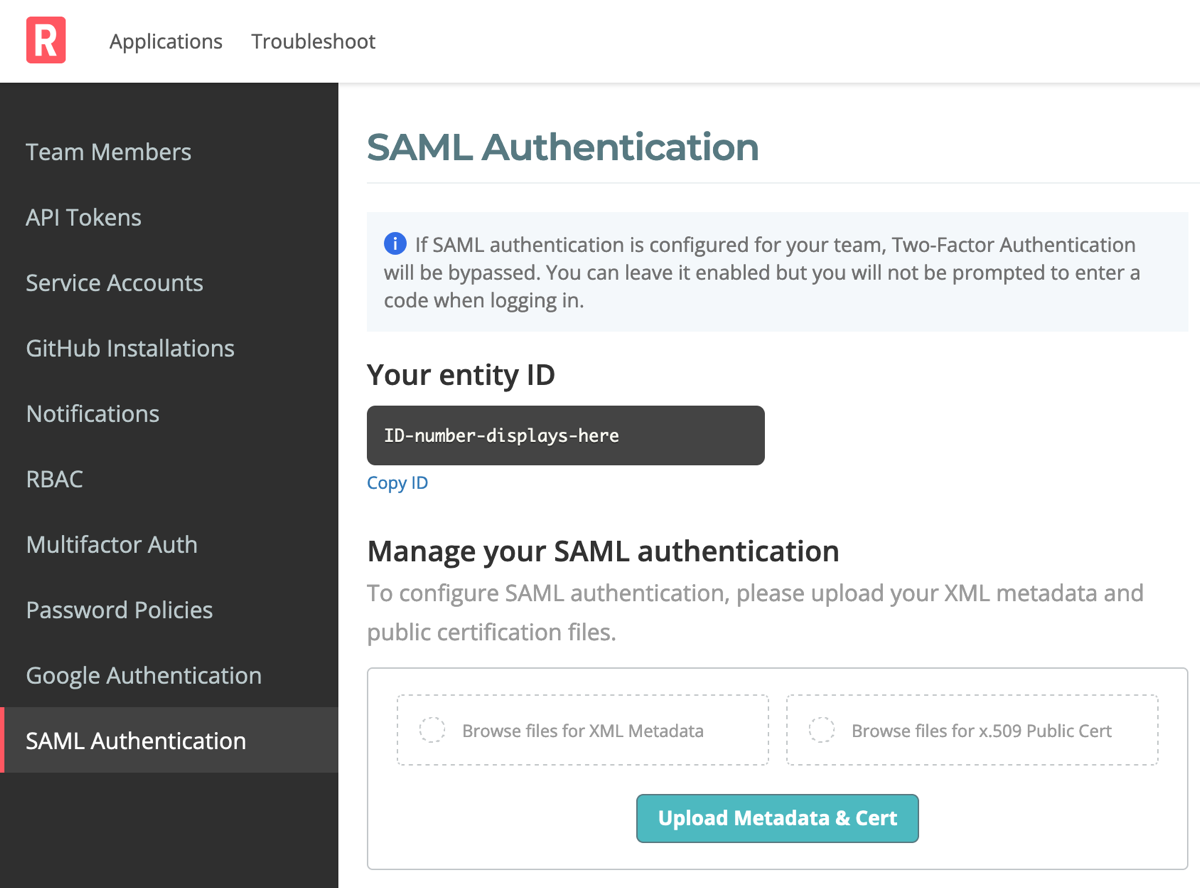
Click SAML Authentication from the navigation menu. If you do not see these options, contact Support.
The SAML Authentication page opens.
-
Browse for, or drag and drop, your XML Metadata file and x.509 PEM file from your SAML provider.
-
Click Upload Metadata & Cert.
Next step
At this point, you have configured SAML, but not enabled it. The next step is to enable SAML enforcement options. For more information, see Enable SAML Enforcement.
Enable SAML enforcement
After you have uploaded the metadata and x.509 public certificate PEM file, you must enable SAML enforcement options. Replicated provides options that you can enable or disable at any time. You can also change the IDP metadata if needed.
To enable SAML enforcement:
-
From the Vendor Portal, select Team > SAML Authentication.
-
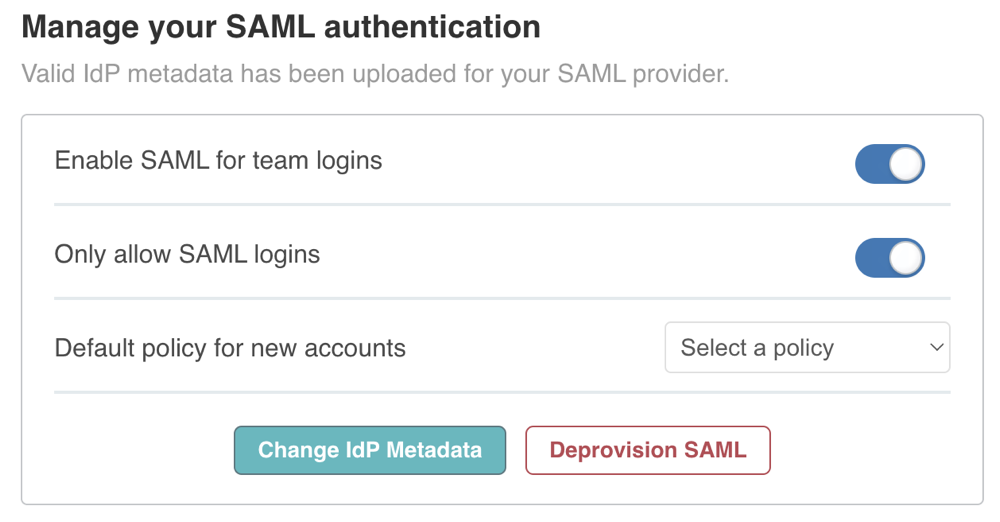
Select either or both login method options in the Manage your SAML authentication pane. Allowing both login methods is a good way to test SAML without risking any interruption for the rest of your team.
Enable SAML for team logins - Allows members of your team to log in to the Vendor Portal through your identity provider. This option does not remove, change, or restrict any other authentication that methods you have configured in the Vendor Portal. If you enable SAML, team members who log in with Vendor Portal accounts can continue to do so.
Only allow SAML logins - Requires members of your team to log in to the Vendor Portal through your identity provider. Prevents any non-SAML accounts from logging in. Replicated does not delete the existing accounts. If you turn on this option and then later disable it, accounts that never logged in using SAML will be able to log in again. If an account exists outside of SAML and a user authenticates it with SAML, Replicated converts the account. The converted account cannot authenticate with a password again.
-
(Optional) Set a default policy for new accounts from the drop-down list.
-
(Optional) Click Change IdP Metadata and follow the prompts to upload any changes to your metadata.
You have enabled SAML on your account. For your team to use the SAML login option, you must enable access through your SAML identity provider’s dashboard. For example, if you use Okta, assign the application to users or groups. When a user clicks through to use the application, they gain access. For more information about provisioning new users, see Provisioning users with SAML.
Troubleshooting
Error: No SAML-enabled teams found for email domain
On the Vendor Portal SAML login page (https://vendor.replicated.com/login-saml), a user sees this error when no SAML-enabled team authorizes their email domain. This error usually has one of the following causes:
- The user does not yet exist in your team, and your team's SAML configuration does not list their email domain. To let new users provision automatically by email domain, contact Support or your account team. For more information, see Provisioning users with SAML.
- The email domain that the user entered does not match a domain that your team's SAML configuration authorizes. Confirm that the user entered their correct work email address.
If you have assigned the user the Replicated application in your identity provider, the user can also log in from the identity provider dashboard. Your identity provider then JIT provisions their account without domain redirect.
Error: Invalid team ID for this domain
On the Vendor Portal SAML login page (https://vendor.replicated.com/login-saml), a user sees this error when the team ID that they entered does not match a SAML-enabled team that authorizes their email domain. This error usually has one of the following causes:
- The user entered the team ID from the Team Members page. That is a different value, and the SAML login page does not accept it. For more information, see Team IDs for domains with multiple SAML teams.
- The user entered a team ID for a team that does not authorize their email domain. Confirm that the user entered their correct work email address.
If your team does not enable Only allow SAML logins, you can also invite the user from the Team Members page instead of giving them a team ID. A pending invitation identifies the team on its own, so the user is not asked for a team ID when they log in. This applies for seven days after you send the invitation.
Disable SAML enforcement
You can disable SAML authentication options at any time and re-enable them later if needed.
To disable SAML enforcement:
-
From the Vendor Portal, select Team > SAML Authentication.
-
Click Deprovision SAML in the Manage your SAML authentication pane.