About customers and licensing
This topic provides an overview of customers and licenses in the Replicated Platform.
Overview
The Replicated Platform provides a license and update server that securely delivers license entitlements to your application at installation and runtime, using each customer's unique license ID for authentication.
You can use the Replicated Platform licensing features to:
- Securely grant access to your software using each customer's unique license ID
- Control which customers have access to each of your releases
- Define customer-specific metadata and custom license entitlements
- Query customer license details at deployment and runtime
- Track and report on usage on a per-customer basis
Replicated license and update server
The following diagram provides an overview of licensing with the Replicated Platform:

View a larger version of this image
As shown in the diagram above, the Replicated license and update server manages and distributes customer license information. The license server retrieves this license information from customer records managed by vendors in the Vendor Portal.
During installation or upgrade, the customer's license ID is used to authenticate with the license server. The license ID also provides authentication for the Replicated proxy registry, securely granting proxy access to images in the vendor's external registry.
The license server is identified with a CNAME record where it can be accessed from end customer environments. When running alongside an application in a customer environment, the Replicated SDK retrieves up-to-date customer license information from the license server during runtime. The in-cluster SDK API /license/ endpoints can be used to get customer license information on-demand, allowing vendors to programmatically enforce and report on license agreements.
Vendors can also integrate internal Customer Relationship Management (CRM) tools such as Salesforce with the Replicated Platform so that any changes to a customer's entitlements are automatically reflected in the Vendor Portal. This ensures that updates to license agreements are reflected in the customer environment in real time.
About the Vendor Portal customers page
You can create and manage customers in the Replicated Vendor Portal. Each customer record includes several fields that uniquely identify the customer and the application, specify the customer's assigned release channel, and define the customer's entitlements.
The following shows an example of the Customers page:
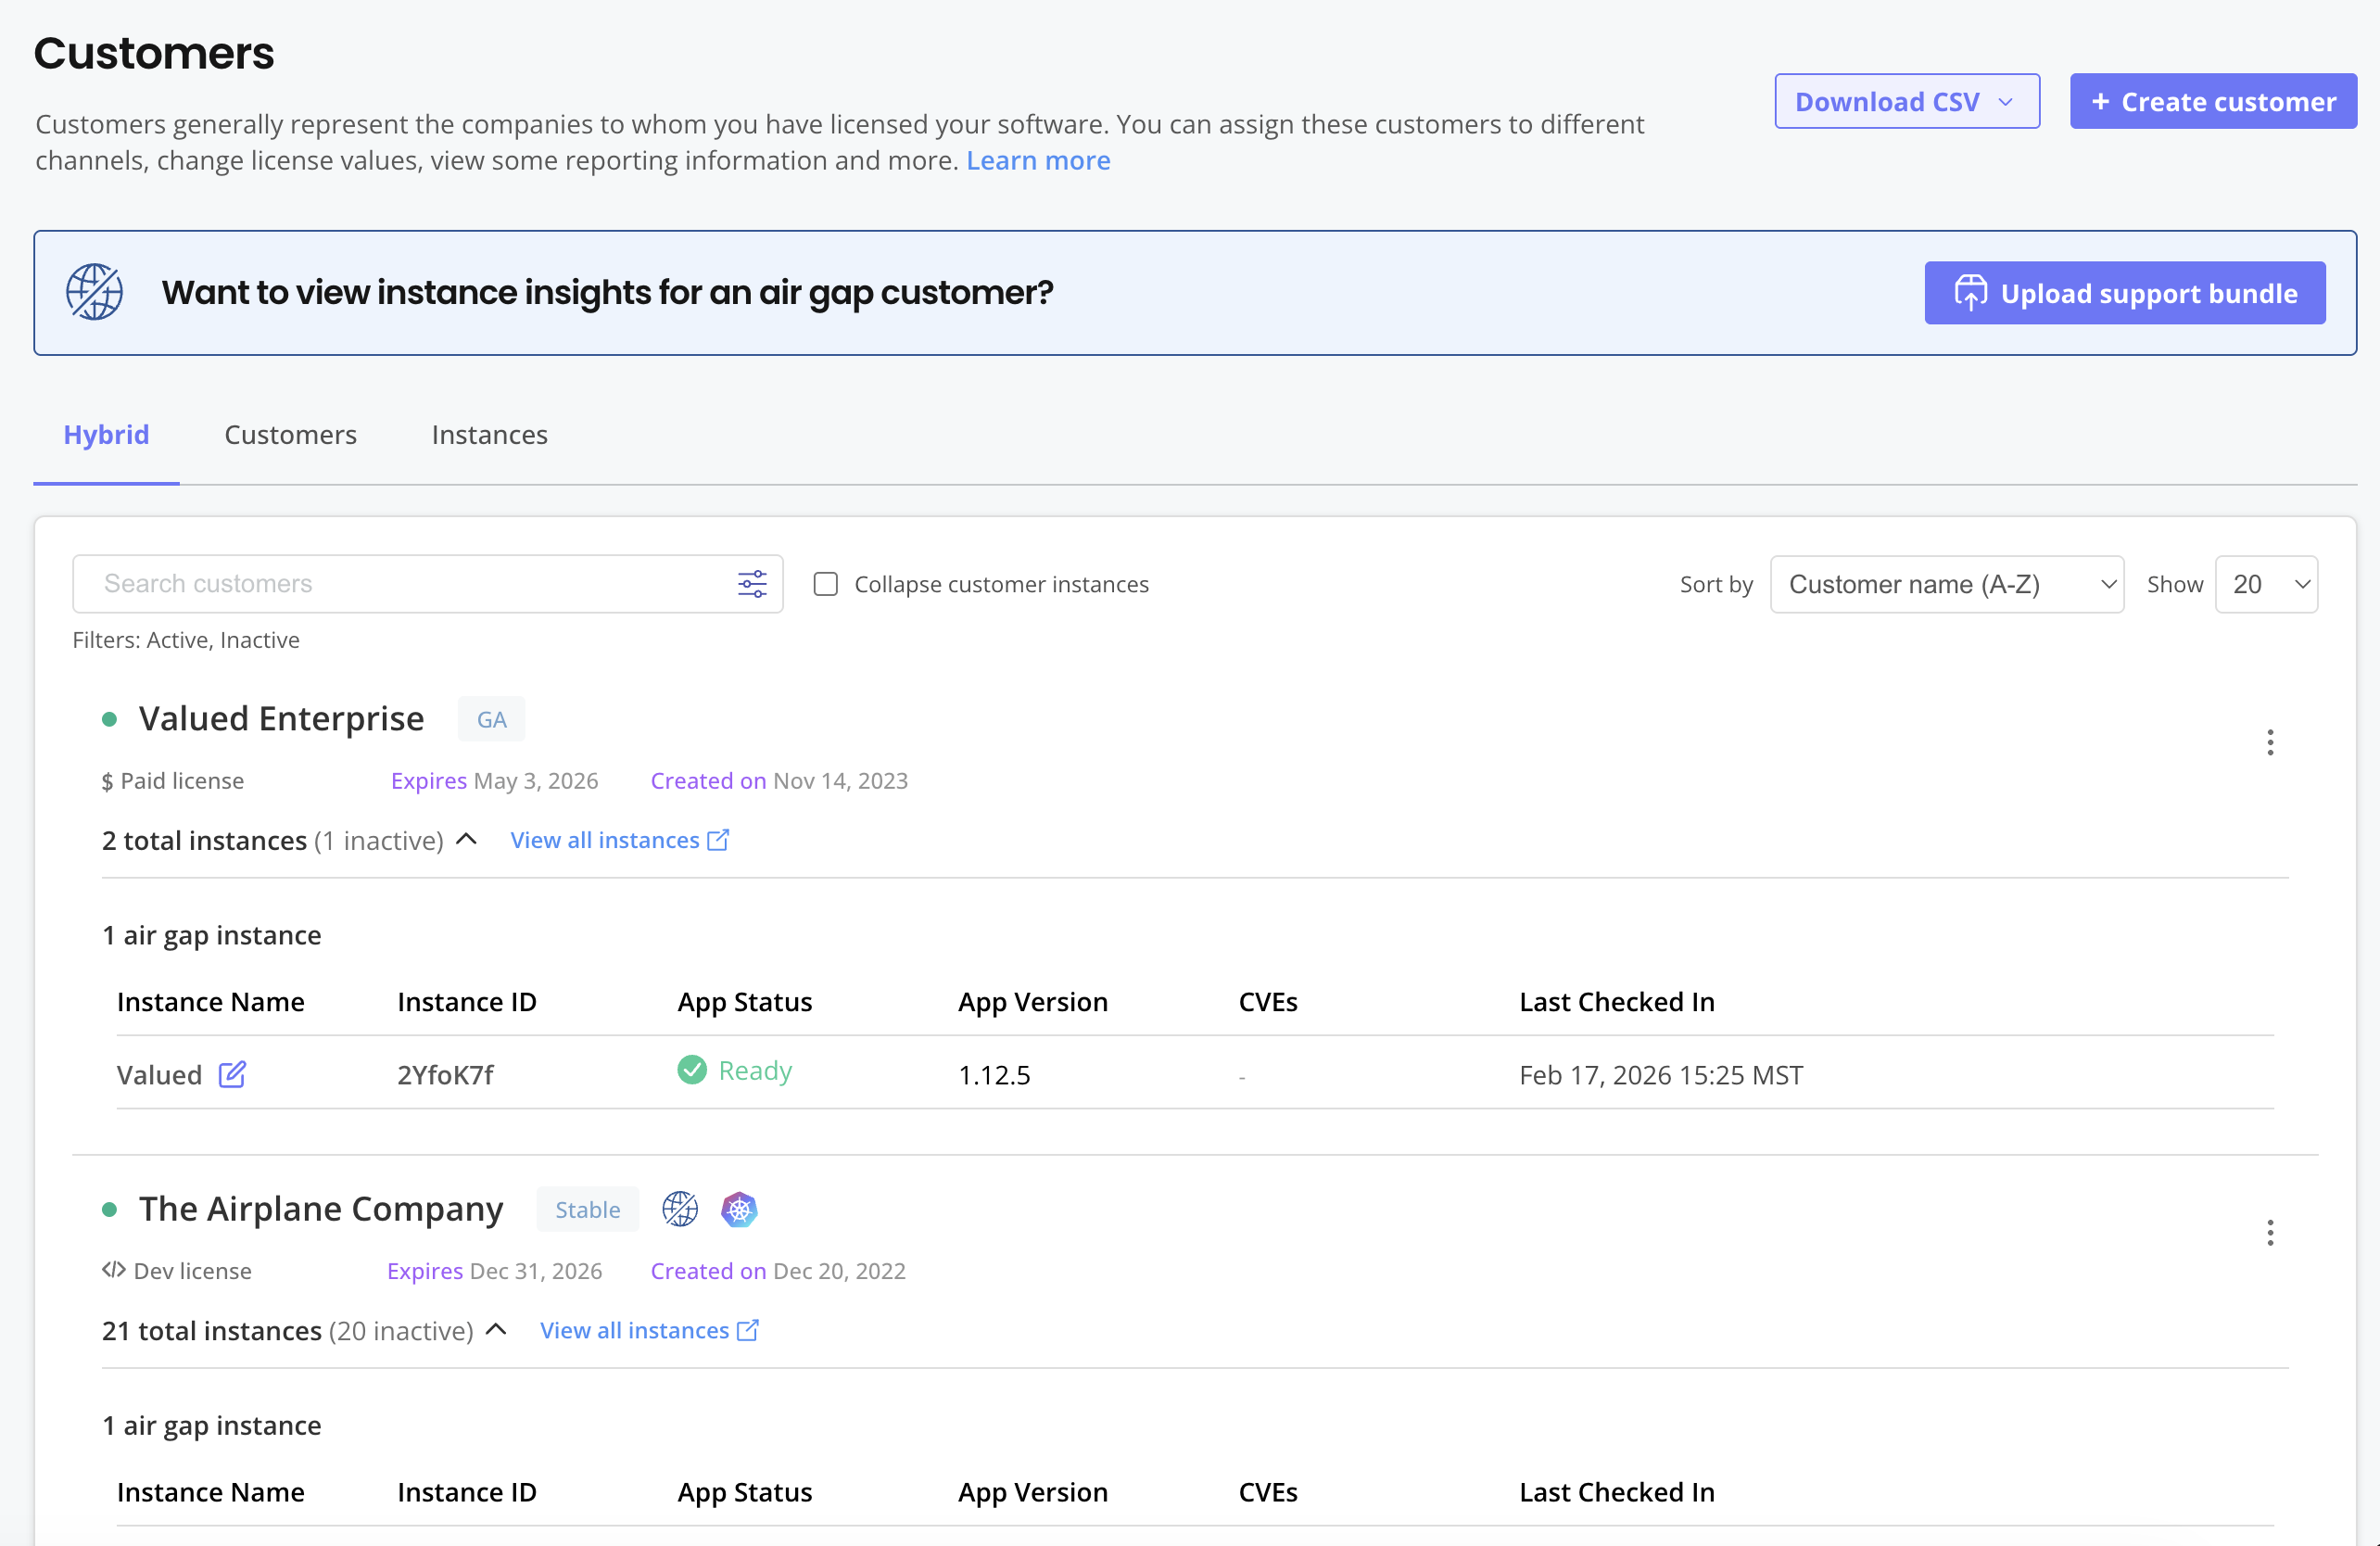
View a larger version of this image
From the Customers page, you can do the following:
- Create new customers
- Download CSVs with customer and instance data
- Search and filter customers
- Download the license file for each customer
- View instance details for each customer, including the version of the application that this instance is running, the Kubernetes distribution of the cluster, the last check-in time, and more
- Archive customers
- Click on a customer to access the following customer-specific pages:
- Reporting: View insights about the cutomer's active instances. See Customer Reporting.
- Manage customer: View and edit details about the customer, including the customer name and email, the license expiration policy, custom license fields, and more. See Create and Manage Customers.
- Support bundles: Upload and analyze support bundles collected in the customer's environment. See Inspect Support Bundles.
- Enterprise Portal access: Manage the customer's access to the Enterprise Portal, invite users, see the status of emails sent to customers through the Enterprise Portal, and more. For information about the Enterprise Portal, see About the Enterprise Portal.
About customer records and license fields
This section describes the ways that you can manage both customer records and customer license fields with the Replicated Platform.
Customer channel assignment
You assign each customer to one of your release channels to determine which application releases they can install. For example, customers assigned to the Stable channel have access to only the releases promoted to the Stable channel. For more information about working with release channels, see About Channels.
You can change the channel a customer is assigned at any time.
For installations with a Replicated installer (Embedded Cluster, KOTS, kURL), when you change the customer's channel, the customer can sync their license in the Admin Console to fetch the latest release on the new channel and then upgrade. The Admin Console always fetches the latest release on the new channel, regardless of the presence of any releases on the channel that are marked as required.
For Helm CLI installations, changing the customer's assigned channel determines which releases are available when the customer pulls from the Replicated registry. Unlike Replicated installers, Helm does not automatically detect or apply updates. After you change the channel, the customer must run helm upgrade to move to a release on the new channel, or helm rollback to return to a previous release. Note that Helm ignores pre-release versions by default, so the customer must specify the version explicitly with the --version flag.
For example, if the latest release promoted to the Beta channel is version 1.25.0 and version 1.10.0 is marked as required, when you edit an existing customer to assign them to the Beta channel, then the Admin Console always fetches 1.25.0, even though 1.10.0 is marked as required. The required release 1.10.0 is ignored and is not available to the customer for upgrade. For more information about required releases, see Required Releasees in About Channels and Releases.
Customer types
Each customer is assigned one of the following types:
- Development: The Development type can be used internally by the development team for testing and integration.
- Trial: The Trial type can be used for customers who are on 2-4 week trials of your software.
- Paid: The Paid type identifies the customer as a paying customer for which additional information can be provided.
- Community: The Community type is designed for a free or low cost version of your application. For more information, see Community Licenses.
- Single Tenant Vendor Managed: The Single Tenant Vendor Managed type is for customers for whom your team is operating the application in infrastructure you fully control and operate. Single Tenant Vendor Managed licenses are free to use, but Replicated support is limited to the SaaS features of the Replicated Platform.
Except Community licenses, the license type is used solely for reporting purposes and a customer's access to your application is not affected by the type that you assign. You can change the type of a license at any time in the Vendor Portal. For example, if a customer upgraded from a trial to a paid account, then you could change their license type from Trial to Paid for reporting purposes.
Built-in and custom license fields
Each customer record in the Vendor Portal has built-in fields and also supports custom fields:
-
The built-in fields include values such as the customer name, customer email, and the license expiration date. For a complete list of all built-in fields, see Built-In License Fields.
-
You can also create custom fields to define entitlements for your application. This is useful to add business- and application-specific data to customer licenses. For more information, see Manage Custom License Fields. The following are some common use cases for custom license fields:
- Set usage or capacity limits with fields like
max_users,seats,storage_gb, orapi_calls_per_month - Enable access to certain features or tiers. For example, you could add a
tierlicense field with values such as "basic", "premium", or "enterprise". You could also add asupport_levelfield with options for "standard" or "priority". - Store configuration settings like
api_endpoint,region,data_center, orenvironment - Include credentials in the license like
api_key,auth_token, orencryption_keyusing the "Password" license field type to mask values in the UI - Add metadata such as
contract_type,renewal_date, oraccount_managerfor reporting and workflows
- Set usage or capacity limits with fields like
Default values for license fields
You can configure default values for both built-in and custom license fields from the Vendor Portal License Fields page. Setting default values is especially useful when:
- Most of your customers share the same license configuration (for example, all customers are assigned a specific channel)
- You want to standardize which install types are enabled by default
- You want your custom entitlements like seat counts or feature tiers to default to certain values when not explicitly set
When you set defaults for built-in license fields (such as the assigned channel, license expiration date, or supported installation types), the fields are automatically pre-populated with your defaults when your team creates a new customer from the Vendor Portal UI. You can also lock built-in license fields to prevent team members from changing the defaults. For information about how to set defaults for the built-in license fields, see Set Initial Values for Built-In License Fields.
When you set default values for your custom license fields, the default values are applied unless the field was explicitly set through Vendor Portal UI or the Vendor API. For information about how to set defaults for your custom license fields, see Create Custom License Fields or Update Custom License Fields.
How end customers sync licenses
When you make changes to customer licenses, there are different ways to sync the customer's license with the most recent changes depending on the installation method.
Online installations with Replicated installers
Customers that install in online environments with a Replicated installer (Embedded Cluster, KOTS, kURL) can use the Admin Console to get the latest license details from the Vendor Portal. Then, they deploy a new version that includes the license changes. Deploying a new version with the license changes ensures that any license fields that you have templated in your release using Replicated template functions are rendered with the latest license details.
For online instances, Replicated installers pull license details from the Vendor Portal when:
- A customer clicks Sync license in the Admin Console.
- An automatic or manual update check is triggered
- The customer updates their instance with Replicated Embedded Cluster. See Perform Updates with Embedded Cluster.
- An application status changes. See Current State in Instance Details.
For more information, see Update Licenses in the Admin Console.
Air gap installations with Replicated installers
To update licenses in air gap installations, customers need to upload the updated license file to the Admin Console. After you update the license fields in the Vendor Portal, you can notify customers by either sending them a new license file or instructing them to log into the Enterprise Portal to downlaod the new license.
Helm installations
For installations with the Helm CLI, license details can be retrieved from the Vendor Portal during runtime using the in-cluster SDK API license endpoints. For more information, see Replicated SDK API license Endpoints on this page.
About querying license entitlements
You can query license fields from your application before installation and during runtime. This allows you to enforce entitlements and to track and report on usage to share insights with internal teams or end customers.
Replicated SDK API license endpoints
The Replicated SDK includes an in-cluster API that can be used to retrieve up-to-date customer license information from the Vendor Portal during runtime through the license endpoints. This means that you can add logic to your application to get the latest license information without the customer needing to perform a license update. The SDK API also polls the Vendor Portal for updated data every four hours.
For installations with a Replicated installer that include the SDK, end customers need to update their licenses from the Admin Console as described in How End Customers Sync Licenses on this page. However, any logic in your application that uses the SDK API will update the customer's license information without the customer needing to deploy a license update in the Admin Console.
For information about how to use the SDK API to query license entitlements at runtime, see Query Entitlements with the Replicated SDK API.
Default license expiration handling
The built-in expires_at license field defines the expiration date for a customer license. When you set an expiration date in the Vendor Portal, the expires_at field is encoded in ISO 8601 format (2026-01-23T00:00:00Z) and is set to midnight UTC at the beginning of the calendar day (00:00:00) on the date selected.
Replicated enforces the following logic when a license expires:
- By default, instances with expired licenses continue to run.
To change the behavior of your application when a license expires, you can can add custom logic in your application that queries the
expires_atfield using the Replicated SDK in-cluster API. - Expired licenses cannot log in to the Replicated registry to pull a Helm chart for installation or upgrade.
- Expired licenses cannot pull application images through the Replicated proxy registry or from the Replicated registry.
- For installations with a Replicated installer (Embedded Cluster, KOTS, kURL), the installer prevents instances with expired licenses from receiving updates.