Disaster recovery for Embedded Cluster (Alpha)
This topic describes the disaster recovery feature for Replicated Embedded Cluster, including how to enable disaster recovery for your application. It also describes how end users can configure disaster recovery in the Replicated KOTS Admin Console and restore from a backup.
Disaster recovery for Embedded Cluster v2 is an Alpha feature and will not advance beyond Alpha. This feature is subject to change, including breaking changes. To get access to this feature, reach out to your Replicated account team.
The disaster recovery model is changing in Embedded Cluster v3. Rather than Replicated managing Velero as part of Embedded Cluster, vendors include and manage Velero directly in their application release. For more information, reach out to your Replicated account team.
Embedded Cluster does not support backup and restore with the KOTS snapshots feature. For more information about using snapshots for existing cluster installations with KOTS, see About Backup and Restore with Snapshots.
Overview
The Embedded Cluster disaster recovery feature allows your customers to take backups from the Admin Console and perform restores from the command line. Disaster recovery for Embedded Cluster is implemented with Velero. For more information about Velero, see the Velero documentation.
The backups that your customers take from the Admin Console will include both the Embedded Cluster infrastructure and the application resources that you specify.
The Embedded Cluster infrastructure that is backed up includes components such as the KOTS Admin Console and the built-in registry that is deployed for air gap installations. No configuration is required to include Embedded Cluster infrastructure in backups. Vendors specify the application resources to include in backups by configuring a Velero Backup resource in the application release.
Requirements
Embedded Cluster disaster recovery has the following requirements:
- The disaster recovery feature flag must be enabled for your account. To get access to disaster recovery, reach out to your Replicated account team.
- Embedded Cluster version 1.22.0 or later
- Backups must be stored in AWS S3
Limitations and known issues
Embedded Cluster disaster recovery has the following limitations and known issues:
-
Embedded Cluster supports only AWS S3 as a storage location for backups. Other S3-compatible storage providers (such as MinIO) are not tested or officially supported. Because AWS S3 requires internet access, disaster recovery is not supported for air gap installations.
-
During a restore, the version of the Embedded Cluster installation assets must match the version of the application in the backup. So if version 0.1.97 of your application was backed up, the Embedded Cluster installation assets for 0.1.97 must be used to perform the restore. Use
./APP_SLUG versionto check the version of the installation assets, whereAPP_SLUGis the unique application slug. For example: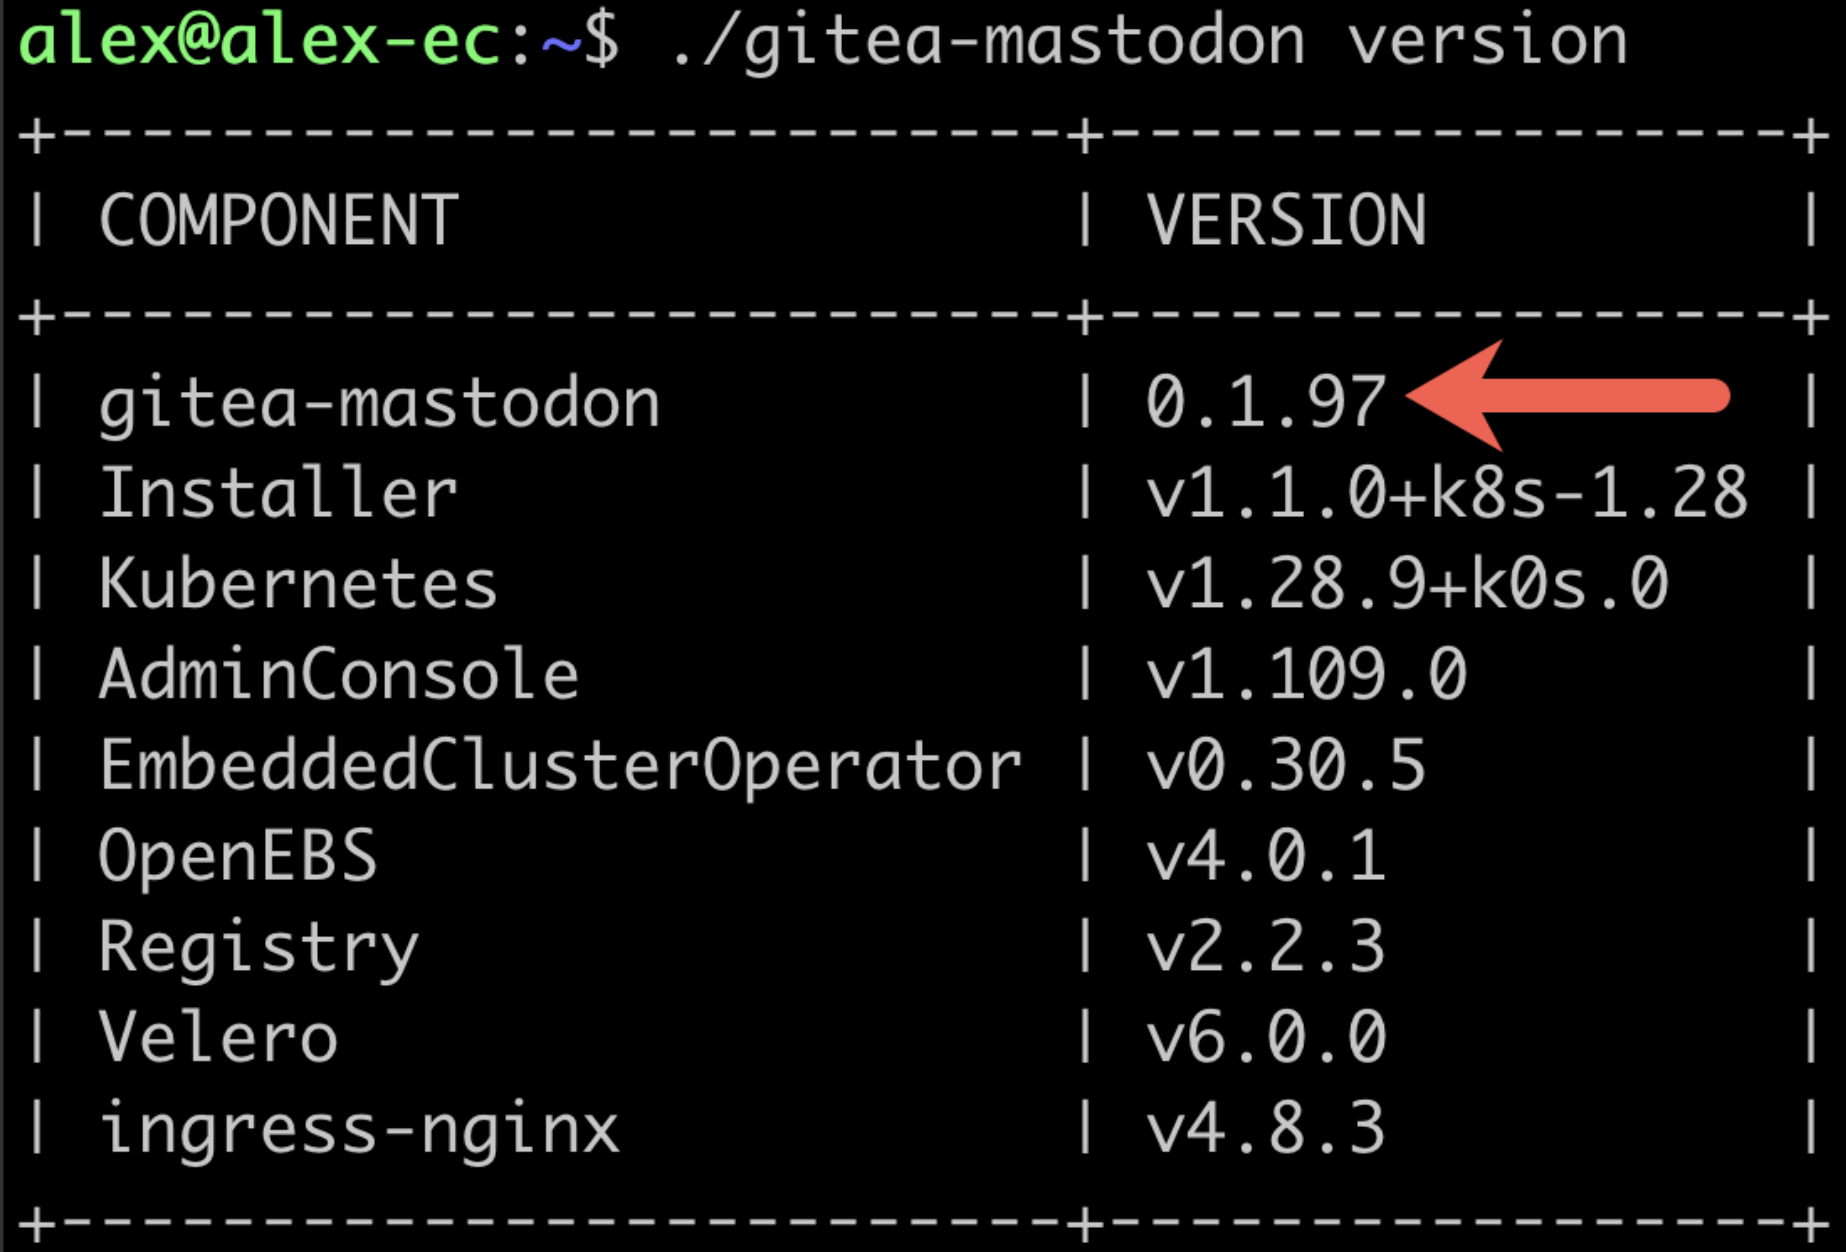
-
Any Helm extensions included in the
extensionsfield of the Embedded Cluster Config are not included in backups. Helm extensions are reinstalled as part of the restore process. To include Helm extensions in backups, configure the Velero Backup resource to include the extensions using namespace-based or label-based selection. For more information, see Configure the Velero Custom Resources below. -
Users can only restore from the most recent backup.
-
Velero is installed only during the initial installation process. Enabling the disaster recovery license field for customers after they have already installed will not do anything.
-
If the
--admin-console-portflag was used during install to change the port for the Admin Console, note that during a restore the Admin Console port will be used from the backup and cannot be changed. For more information, see install.
Configure disaster recovery
This section describes how to configure disaster recovery for Embedded Cluster installations. It also describes how to enable access to the disaster recovery feature on a per-customer basis.
Configure the Velero custom resources
This section describes how to set up Embedded Cluster disaster recovery for your application by configuring Velero Backup and Restore custom resources in a release.
To configure Velero Backup and Restore custom resources for Embedded Cluster disaster recovery:
-
In a new release containing your application files, add a Velero Backup resource. In the Backup resource, use namespace-based or label-based selection to indicate the application resources that you want to be included in the backup. For more information, see Backup API Type in the Velero documentation.
importantIf you use namespace-based selection to include all of your application resources deployed in the
kotsadmnamespace, ensure that you exclude the Replicated resources that are also deployed in thekotsadmnamespace. Because the Embedded Cluster infrastructure components are always included in backups automatically, this avoids duplication.Example:
The following Backup resource uses namespace-based selection to include application resources deployed in the
kotsadmnamespace:apiVersion: velero.io/v1kind: Backupmetadata:name: backupspec:# Back up the resources in the kotsadm namespaceincludedNamespaces:- kotsadmorLabelSelectors:- matchExpressions:# Exclude Replicated resources from the backup- { key: kots.io/kotsadm, operator: NotIn, values: ["true"] } -
In the same release, add a Velero Restore resource. In the
backupNamefield of the Restore resource, include the name of the Backup resource that you created. For more information, see Restore API Type in the Velero documentation.Example:
apiVersion: velero.io/v1kind: Restoremetadata:name: restorespec:# the name of the Backup resource that you createdbackupName: backupincludedNamespaces:- '*' -
For any image names that you include in your Backup and Restore resources, rewrite the image name using the Replicated KOTS HasLocalRegistry, LocalRegistryHost, and LocalRegistryNamespace template functions. This ensures that the image name is rendered correctly during deployment, allowing the image to be pulled from the user's local image registry (such as in air gap installations) or through the Replicated proxy registry.
Example:
apiVersion: velero.io/v1kind: Restoremetadata:name: restorespec:hooks:resources:- name: restore-hook-1includedNamespaces:- kotsadmlabelSelector:matchLabels:app: examplepostHooks:- init:initContainers:- name: restore-hook-init1image:# Use HasLocalRegistry, LocalRegistryHost, and LocalRegistryNamespace# to template the image nameregistry: '{{repl HasLocalRegistry | ternary LocalRegistryHost "proxy.replicated.com" }}'repository: '{{repl HasLocalRegistry | ternary LocalRegistryNamespace "proxy/my-app/quay.io/my-org" }}/nginx'tag: 1.24-alpineFor more information about how to rewrite image names using the KOTS HasLocalRegistry, LocalRegistryHost, and LocalRegistryNamespace template functions, including additional examples, see Support Installations with HelmChart v2.
-
If you support air gap installations, add any images that are referenced in your Backup and Restore resources to the
additionalImagesfield of the Replicated Application custom resource. This ensures that the images are included in the air gap bundle for the release so they can be used during the backup and restore process in environments with limited or no outbound internet access. For more information, see additionalImages in Application.Example:
apiVersion: kots.io/v1beta1kind: Applicationmetadata:name: my-appspec:additionalImages:- elasticsearch:7.6.0- quay.io/orgname/private-image:v1.2.3 -
(Optional) Use Velero functionality like backup and restore hooks to customize the backup and restore process as needed.
Example:
For example, a Postgres database might be backed up using pg_dump to extract the database into a file as part of a backup hook. It can then be restored using the file in a restore hook:
podAnnotations:backup.velero.io/backup-volumes: backuppre.hook.backup.velero.io/command: '["/bin/bash", "-c", "PGPASSWORD=$POSTGRES_PASSWORD pg_dump -U {{repl ConfigOption "postgresql_username" }} -d {{repl ConfigOption "postgresql_database" }} -h 127.0.0.1 > /scratch/backup.sql"]'pre.hook.backup.velero.io/timeout: 3mpost.hook.restore.velero.io/command: '["/bin/bash", "-c", "[ -f \"/scratch/backup.sql\" ] && PGPASSWORD=$POSTGRES_PASSWORD psql -U {{repl ConfigOption "postgresql_username" }} -h 127.0.0.1 -d {{repl ConfigOption "postgresql_database" }} -f /scratch/backup.sql && rm -f /scratch/backup.sql;"]'post.hook.restore.velero.io/wait-for-ready: 'true' # waits for the pod to be ready before running the post-restore hook -
Save and the promote the release to a development channel for testing.
Extend disaster recovery with custom Velero plugins
Introduced in Embedded Cluster v2.13.0
You can extend Velero's backup and restore capabilities by configuring custom Velero plugins in the Embedded Cluster Config. This is useful if you need to add support for specific backup scenarios, such as backing up databases like PostgreSQL, MySQL, or other stateful applications that require advanced disaster recovery capabilities.
To configure custom Velero plugins, use the extensions.velero.plugins key in the Embedded Cluster Config. For more information, see Configure Velero Plugins in Embedded Cluster Config.
Enable the disaster recovery feature for your customers
After configuring disaster recovery for your application, you can enable it on a per-customer basis with the Allow Disaster Recovery (Alpha) license field.
To enable disaster recovery for a customer:
-
In the Vendor Portal, go to the Customers page and select the target customer.
-
On the Manage customer page, under License options, enable the Allow Disaster Recovery (Alpha) field.
When your customer installs with Embedded Cluster, Velero will be deployed if the Allow Disaster Recovery (Alpha) license field is enabled.
Take backups and restore
This section describes how your customers can configure backup storage, take backups, and restore from backups.
Configure backup storage and take backups in the Admin Console
Customers with the Allow Disaster Recovery (Alpha) license field can configure their backup storage location and take backups from the Admin Console.
To configure backup storage and take backups:
-
After installing the application and logging in to the Admin Console, click the Disaster Recovery tab at the top of the Admin Console.
-
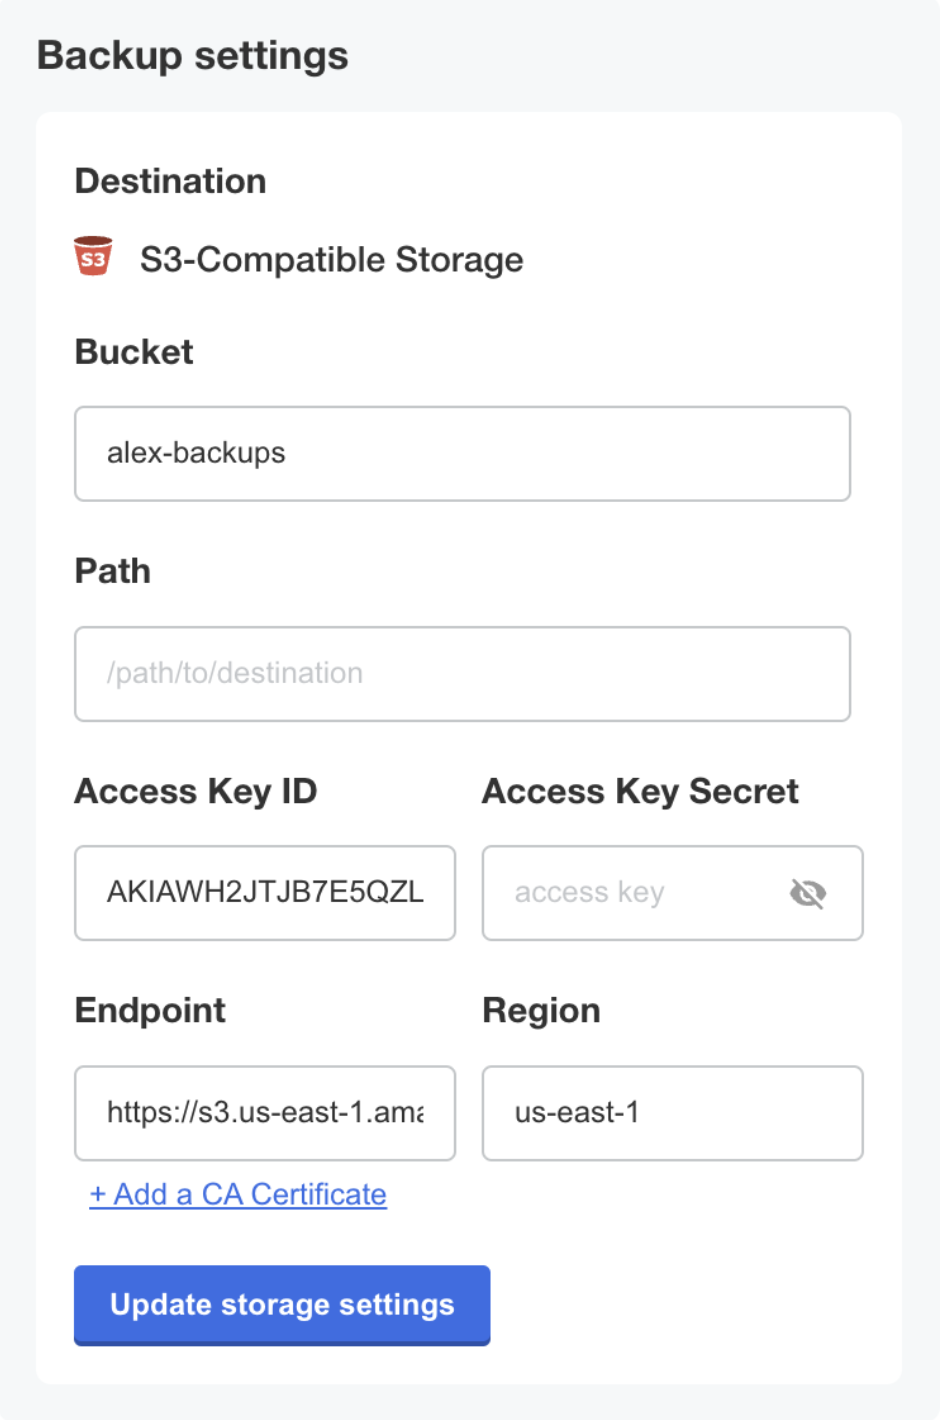
For the desired S3-compatible backup storage location, enter the bucket, prefix (optional), access key ID, access key secret, endpoint, and region. Click Update storage settings.
-
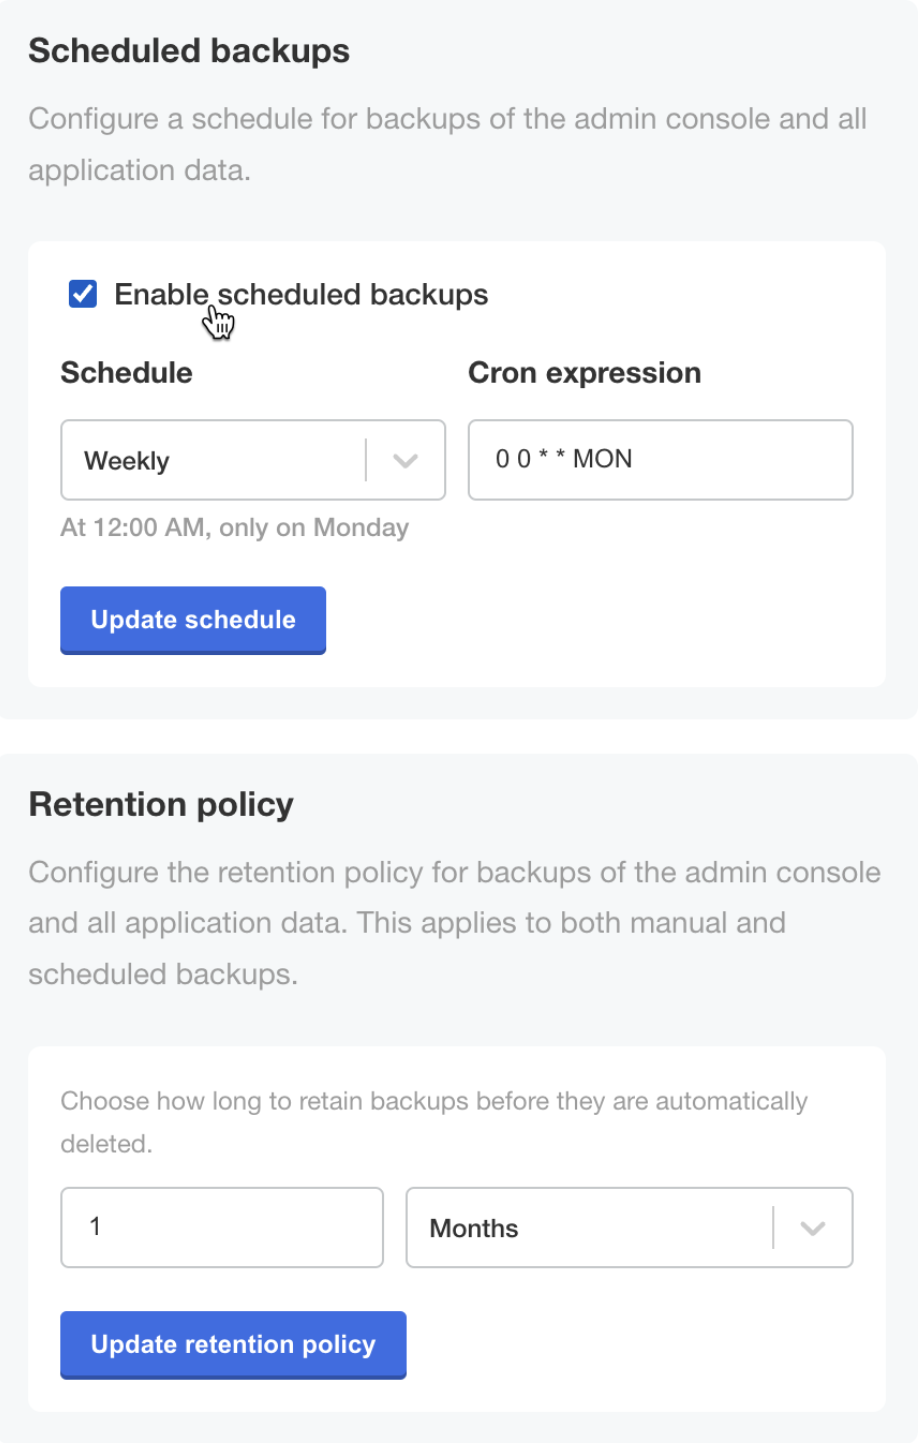
(Optional) From this same page, configure scheduled backups and a retention policy for backups.
-
In the Disaster Recovery submenu, click Backups. Backups can be taken from this screen.

Restore from a backup
To restore from a backup:
-
SSH onto a new machine where you want to restore from a backup.
-
Download the Embedded Cluster installation assets for the version of the application that was included in the backup. You can find the command for downloading Embedded Cluster installation assets in the Embedded Cluster install instructions dialog for the customer. For more information, Online Installation with Embedded Cluster.
noteThe version of the Embedded Cluster installation assets must match the version that is in the backup. For more information, see Limitations and Known Issues.
-
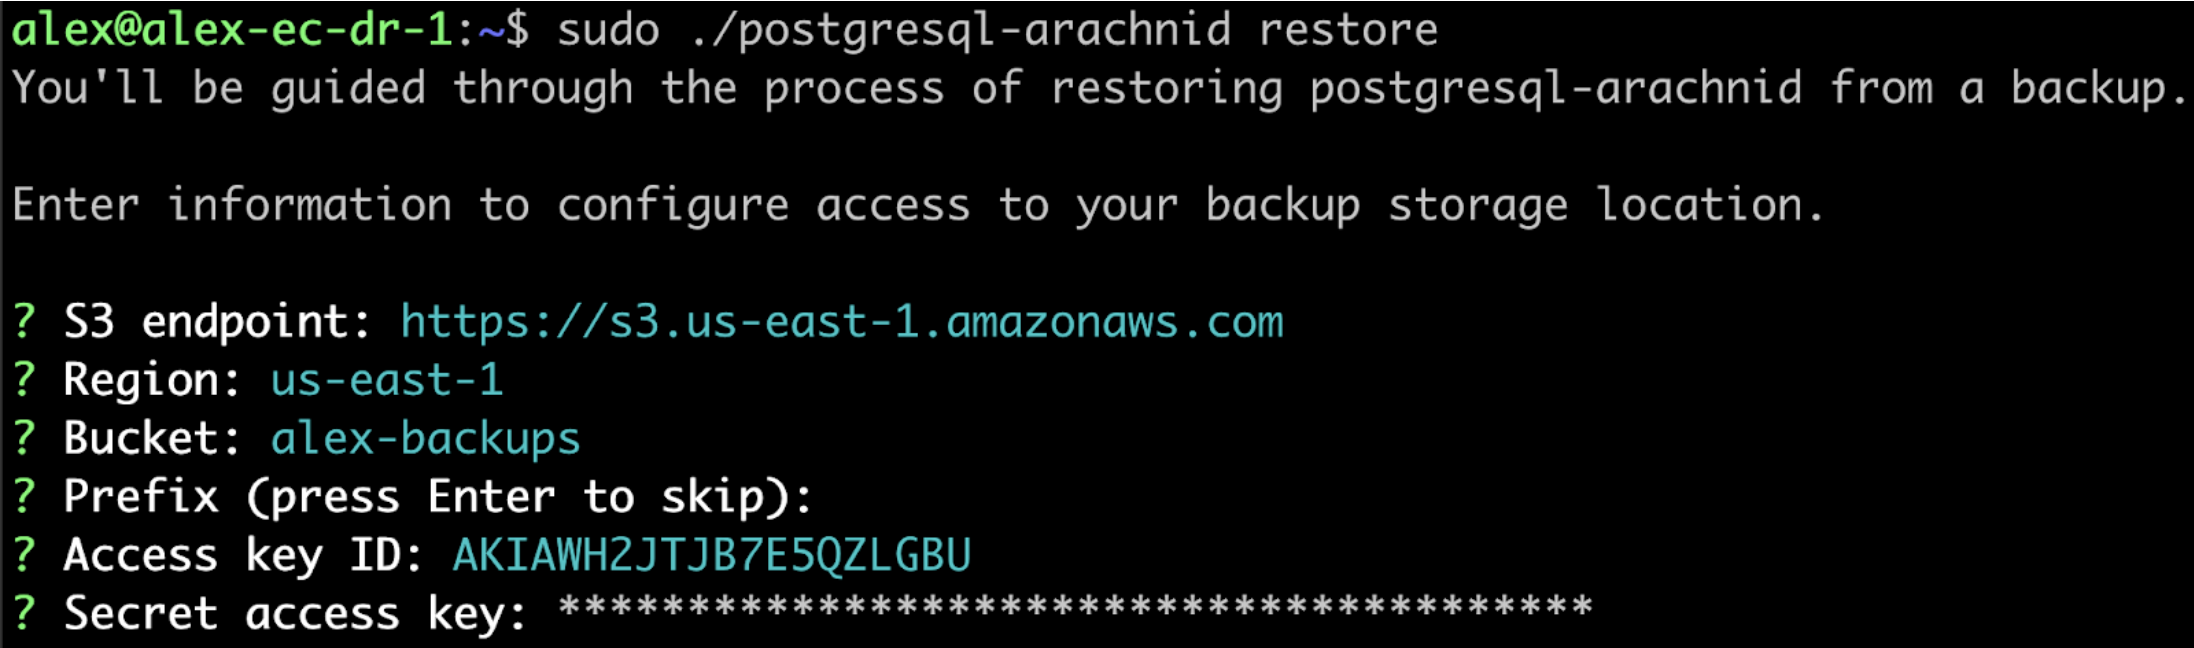
Run the restore command:
sudo ./APP_SLUG restoreWhere
APP_SLUGis the unique application slug.Note the following requirements and guidance for the
restorecommand:-
If the installation is behind a proxy, the same proxy settings provided during install must be provided to the restore command using
--http-proxy,--https-proxy, and--no-proxy. For more information, see install. -
If the
--cidrflag was used during install to the set IP address ranges for Pods and Services, this flag must be provided with the same CIDR during the restore. If this flag is not provided or is provided with a different CIDR, the restore will fail with an error message telling you to rerun with the appropriate value. However, it will take some time before that error occurs. For more information, see install. -
If the
--local-artifact-mirror-portflag was used during install to change the port for the Local Artifact Mirror (LAM), you can optionally use the--local-artifact-mirror-portflag to choose a different LAM port during restore. For example,restore --local-artifact-mirror-port=50000. If no LAM port is provided during restore, the LAM port that was supplied during installation will be used. For more information, see install.
You will be guided through the process of restoring from a backup.
-
-
When prompted, enter the information for the backup storage location.
-
When prompted, confirm that you want to restore from the detected backup.
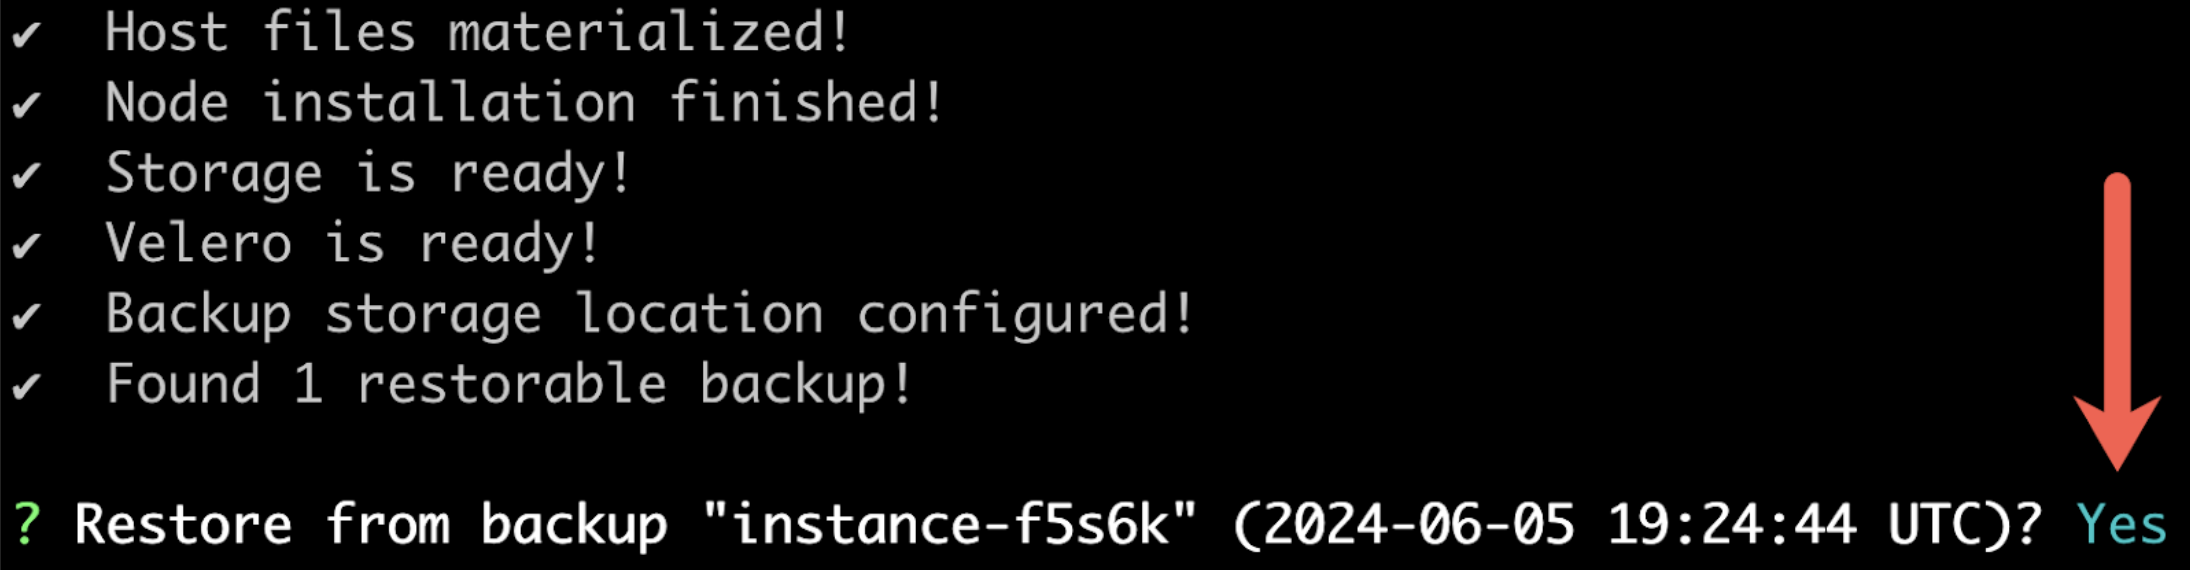 View a larger version of this image
After some time, the Admin console URL is displayed:
-
(Optional) If the cluster should have multiple nodes, go to the Admin Console to get a join command and join additional nodes to the cluster. For more information, see Manage Multi-Node Clusters with Embedded Cluster.
-
Type
continuewhen you are ready to proceed with the restore process. View a larger version of this image
After some time, the restore process completes.
If the
restorecommand is interrupted during the restore process, you can resume by rerunning therestorecommand and selecting to resume the previous restore. This is useful if your SSH session is interrupted during the restore.