Configure Embedded Cluster
This topic provides information about how to configure your application releases to support installations with Replicated Embedded Cluster. For an introduction to Embedded Cluster, see Embedded Cluster Overview.
Add the Embedded Cluster Config resource
An Embedded Cluster Config must be present in the release to support installation with Embedded Cluster. The Embedded Cluster Config sets the version of Embedded Cluster to install, and lets you define additional characteristics about the cluster.
To add the Embedded Cluster Config:
-
Create a new release that includes your application and a unique HelmChart v2 custom resource for each Helm chart in the release.
If you have not yet configured the HelmChart custom resource for your application, see Onboard to the Replicated Platform for more detailed instructions on how to configure releases that support installation with a Replicated installer.
-
In the release, add an Embedded Cluster Config manifest that specifies the Embedded Cluster version to use:
apiVersion: embeddedcluster.replicated.com/v1beta1
kind: Config
spec:
version: 2.13.5+k8s-1.33 -
If your application requires that certain components are deployed before the application and as part of the Embedded Cluster itself, update the Embedded Cluster Config to add extensions.
-
Save the release and promote it to the channel that you use for testing internally.
-
Install with Embedded Cluster in a development environment to test:
-
Go to the Manage customer page for a new or existing Development customer.
-
Under Install types, enable the Embedded Cluster (current generation product) option. Click Save.
-
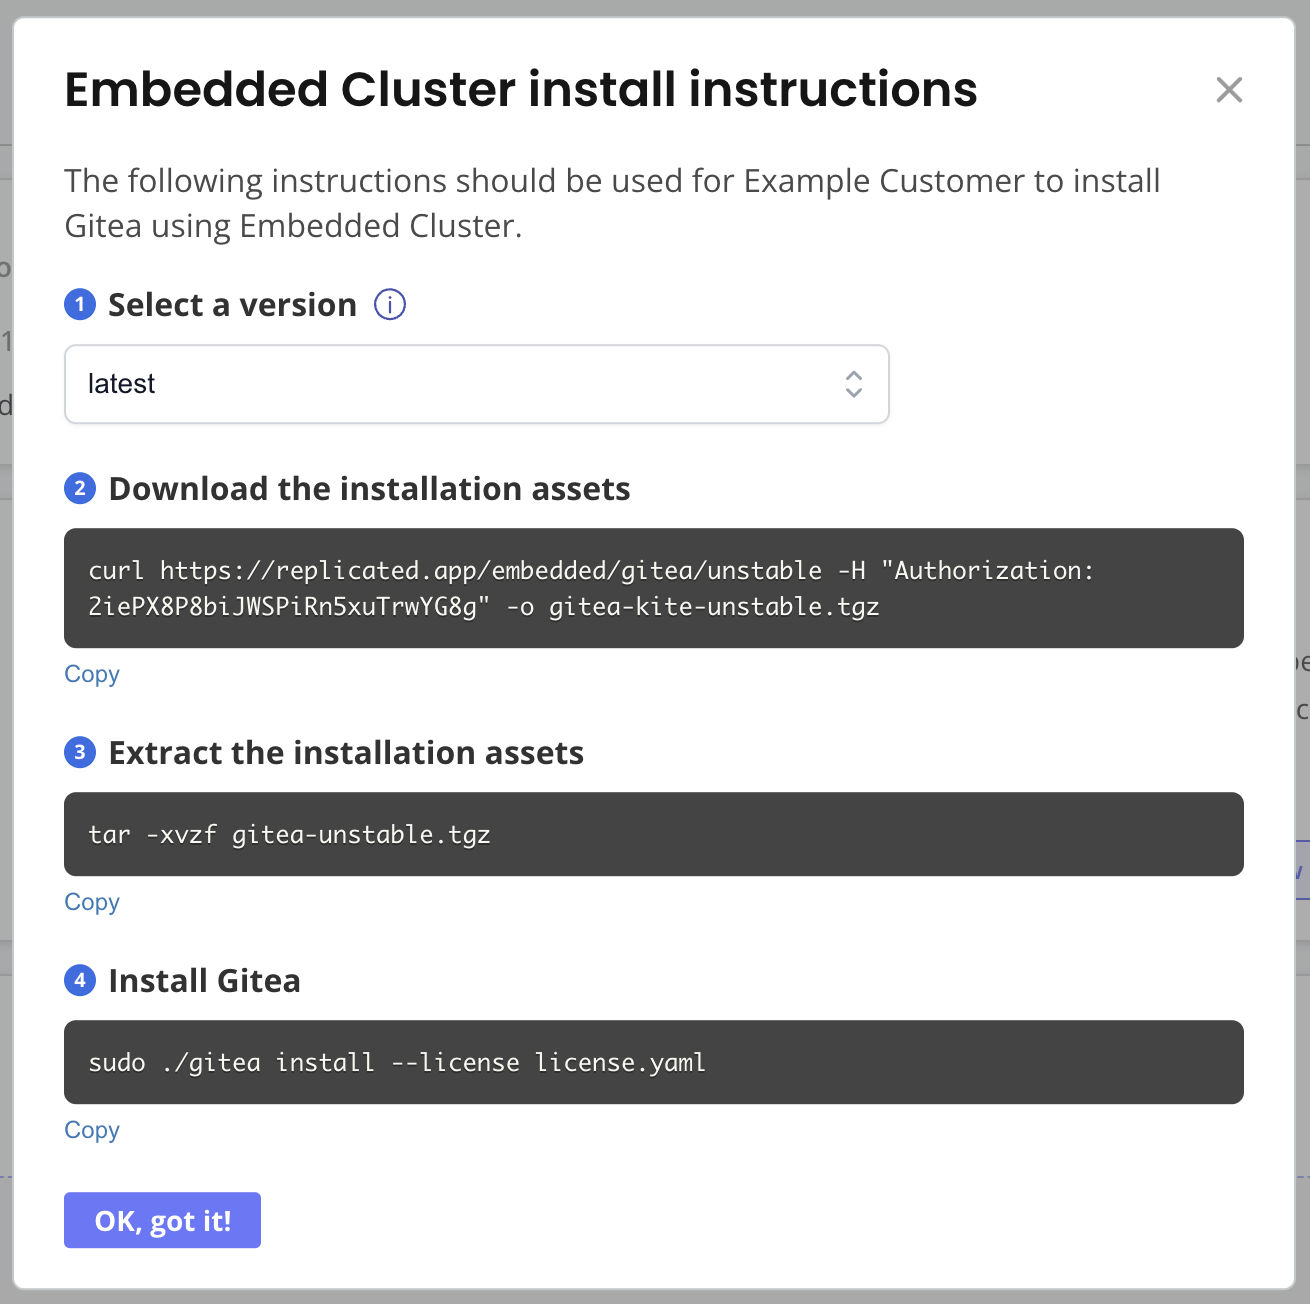
At the top right of the customer page, click Install instructions and choose Embedded Cluster. A dialog appears with instructions on how to download the Embedded Cluster installation assets and install your application.

-
On your VM, run the commands in the Embedded Cluster install instructions dialog.
-
Enter an Admin Console password when prompted.
The Admin Console URL is printed when the installation finishes. Access the Admin Console and follow the instructions in the wizard to install your application.
-
-
After successfully installing your application with Embedded Cluster, customize the Embedded Cluster Config as desired:
- Add your custom domain for the Replicated proxy registry and Replicated app service. See domains.
- Add custom Helm extensions. Extensions allow you to provide Helm charts that are deployed before your application. For example, you can add a Helm extension to ship an ingress controller. See extensions.
- Define roles to assign workloads to specific nodes in multi-node installations. See roles.
Replicated recommends that you work in small iterations and test your changes frequently in your development environment.
(Optional) Serve installation assets using the vendor API
To install with Embedded Cluster, your end customers need to download the Embedded Cluster installer binary and their license. Air gap installations also require an air gap bundle. End customers can download all these installation assets using a curl command by following the installation steps available in the Replicated Enterprise Portal.
However, some vendors already have a portal where their customers can log in to access documentation or download artifacts. In cases like this, you can serve the Embedded Cluster installation assets yourself using the Replicated Vendor API, rather than having customers download the assets from the Replicated app service using a curl command during installation.
To serve Embedded Cluster installation assets with the Vendor API:
-
If you have not done so already, create an API token for the Vendor API. See Use the Vendor API v3.
-
Call the Get an Embedded Cluster release endpoint to download the assets needed to install your application with Embedded Cluster. Your customers must take this binary and their license and copy them to the machine where they will install your application.
Note the following:
-
(Recommended) Provide the
customerIdquery parameter so that the customer’s license is included in the downloaded tarball. This mirrors what is returned when a customer downloads the binary directly using the Replicated app service and is the most useful option. Excluding thecustomerIdis useful if you plan to distribute the license separately. -
If you do not provide any query parameters, this endpoint downloads the Embedded Cluster binary for the latest release on the specified channel. You can provide the
channelSequencequery parameter to download the binary for a particular release.
-
Distribute the NVIDIA gpu operator with Embedded Cluster
Distributing the NVIDIA GPU Operator with Embedded Cluster is not an officially supported feature from Replicated. However, it is a common use case.
The NVIDIA GPU Operator uses the operator framework within Kubernetes to automate the management of all NVIDIA software components needed to provision GPUs. For more information about this operator, see the NVIDIA GPU Operator documentation.
Include the NVIDIA gpu operator and configure containerd options
You can include the NVIDIA GPU Operator in your release as an additional Helm chart, or using Embedded Cluster Helm extensions. For information about adding Helm extensions, see extensions in Embedded Cluster Config.
Using the NVIDIA GPU Operator with Embedded Cluster requires configuring the containerd options in the operator as follows:
# Embedded Cluster Config

  extensions:
    helm:
      repositories:
        - name: nvidia
          url: https://nvidia.github.io/gpu-operator
      charts:
        - name: gpu-operator
          chartname: nvidia/gpu-operator
          namespace: gpu-operator
          version: "v24.9.1"
          values: |
            # configure the containerd options
            toolkit:
             env:
             - name: CONTAINERD_CONFIG
               value: /etc/k0s/containerd.d/nvidia.toml
             - name: CONTAINERD_SOCKET
               value: /run/k0s/containerd.sock
containerd known issue
When the containerd options are configured as shown above, the NVIDIA GPU Operator automatically creates the required configurations in the /etc/k0s/containerd.d/nvidia.toml file. It is not necessary to create this file manually, or modify any other configuration on the hosts.
If you include the NVIDIA GPU Operator as a Helm extension, remove any existing containerd services that are running on the host (such as those deployed by Docker) before attempting to install the release with Embedded Cluster. If there are any containerd services on the host, the NVIDIA GPU Operator will generate an invalid containerd config, causing the installation to fail. For more information, see Installation failure when NVIDIA GPU Operator is included as Helm extension in Troubleshooting Embedded Cluster.
This is the result of a known issue with v24.9.x of the NVIDIA GPU Operator. For more information about the known issue, see container-toolkit does not modify the containerd config correctly when there are multiple instances of the containerd binary in the nvidia-container-toolkit repository in GitHub.