Install and update with Helm in air gap environments
This topic describes how to install and update releases with Helm in air-gapped environments.
Overview
Replicated supports installing and updating with Helm in air-gapped environments with little or no outbound internet access. In air gap installations with Helm, customers are guided through the installation process with instructions provided in either the Replicated Enterprise Portal or the Replicated Download Portal, depending on which is enabled for the customer.
These instructions assume that the customer is logged in to the portal on a workstation that can access both the internet and their internal private image registry. Direct access to the target installation cluster is not required. The instructions also assume that the customer is familiar with curl, docker, helm, and kubernetes, and that they have some familiarity with bash, particularly for automating updates.
Prerequisites
Before you install, complete the following prerequisites:
-
Declare the Replicated SDK as a dependency in your Helm chart. For more information, see Install the SDK as a Subchart in Installing the Replicated SDK.
-
For each Helm chart in your release, add the Replicated HelmChart custom resource. Additionally, if the chart's default values do not expose all the required and optional images that might be needed to install in air-gapped environments, configure the HelmChart resource's
builderkey. For more information about how to configure thebuilderkey, see builder in HelmChart v2.Configuring the
builderkey ensures all the images that might be needed to install in air-gapped environments are included in the Helm CLI installation instructions in the Enterprise Portal. For installations that use the Security Center (Alpha), the HelmChart custom resource is also required to build the list of images that are scanned in the Security Center. -
The customer record in the Vendor Portal must have the following:
-
A valid email address. This email address is only used as a username for the Replicated registry and is never contacted. For more information, see Creating a Customer.
-
The Existing Cluster (Helm CLI) install type enabled. For more information, see Manage Install Types for a License.
-
The Helm CLI Air Gap Instructions install option enabled.
-
Install
Helm air gap installation instructions are provided in either the Enterprise Portal or the Download Portal, depending on which is enabled for the customer.
For more information about enabling the Enterprise Portal for a customer, see Manage Customer Access to the Enterprise Portal.
Enterprise Portal
To install with Helm in an air gap environment using the Enterprise Portal:
-
In the Vendor Portal, go to Customers > [Customer Name] > Reporting.
-
In the Enterprise portal section, click Visit to log in to the portal.
-
In the Enterprise Portal, go to the Install tab then click Helm in the left nav.
-
On the first page of the installation wizard, complete any pre-install instructions. If the vendor did not include any custom pre-install instructions, continue to the next step.
-
Complete the following fields and then click Continue:
- Instance Name: Enter a name for the instance.
- Kubernetes Distribution: Select the Kubernetes distribution of the cluster where you will install.
- Cluster Network Availability: Select the network availability of the cluster. For air gap installations, select No outbound requests allowed (air gap).
- Registry Access: Select the option that describes your current workstation's access to the internal image registry where you will push application images during installation. For air gap installations, select either My workstation can only access the internet AND the registry (NOT the cluster) or I need to download artifacts and transfer them for offline installation.
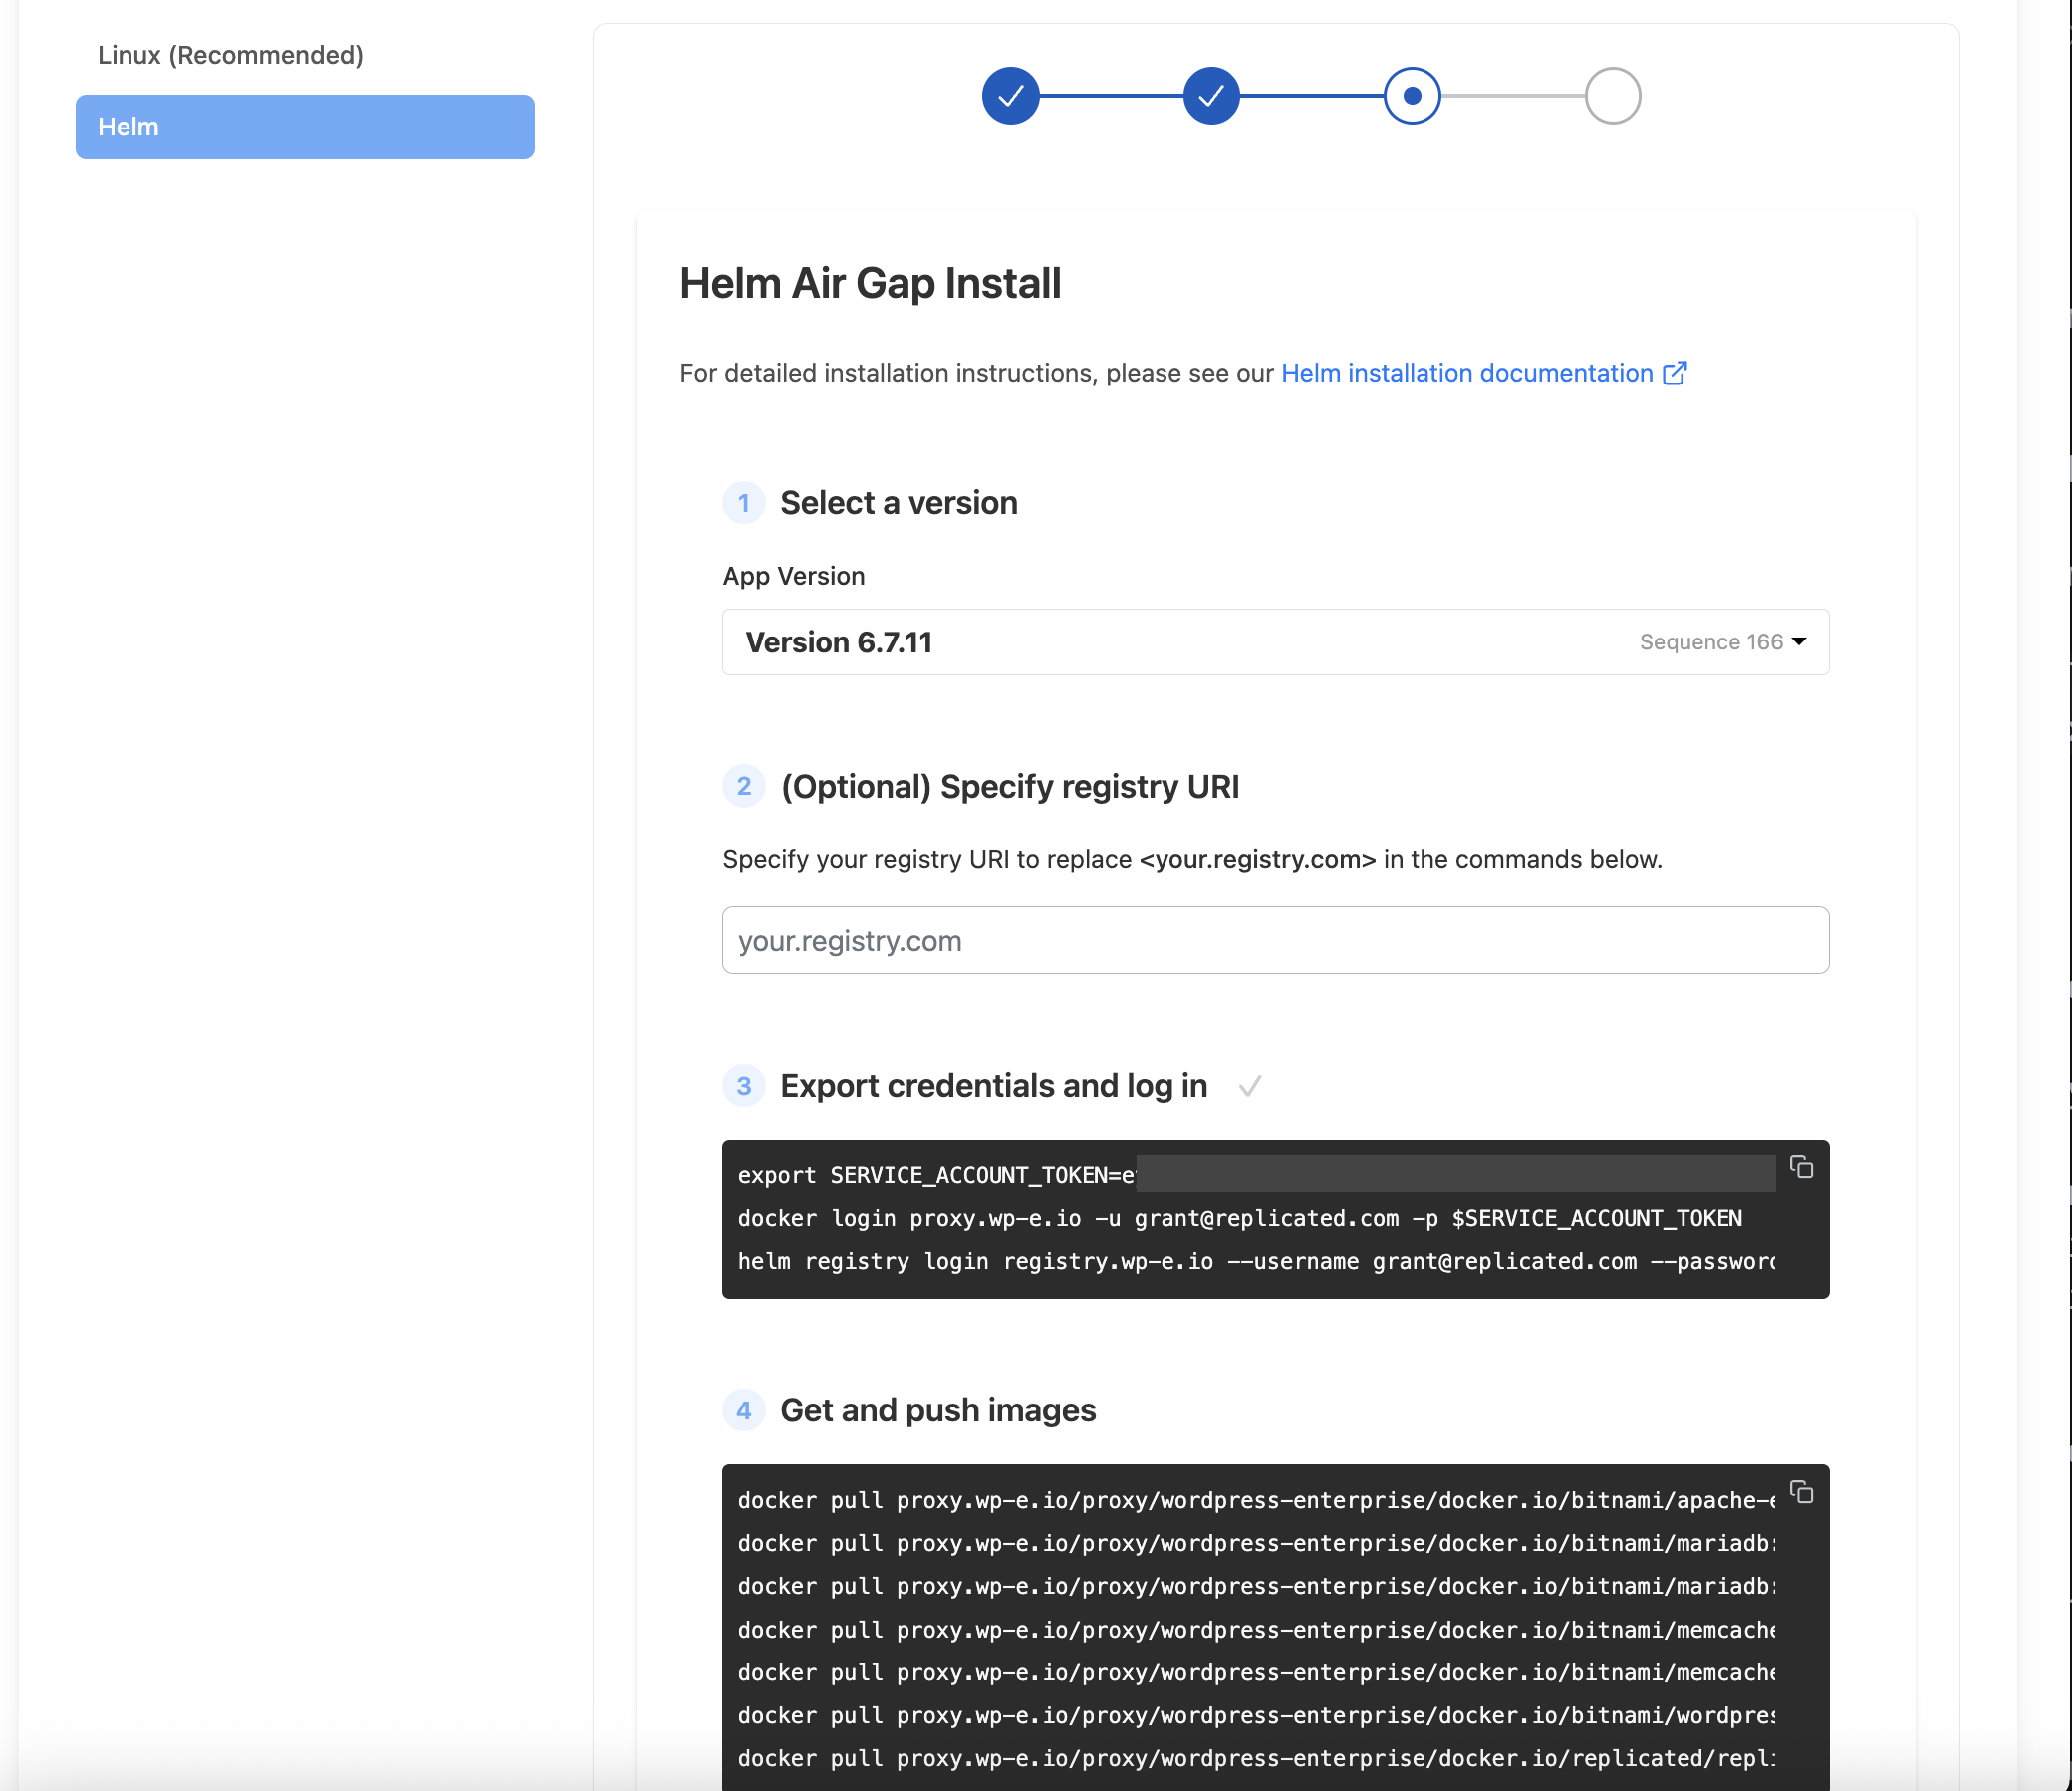
The following shows an example of the Helm air gap installation instructions in the Enterprise Portal:
-
On the Helm Air Gap Install page, follow the instructions provided to install the chart and then click Continue.
-
On the last page of the installation wizard, complete any custom post-installation instructions for the application.
Download Portal
To install with Helm in an air gap environment using the Download Portal:
-
In the Vendor Portal, go to Customers > [Customer Name] > Reporting.
-
In the Download portal section, click Visit download portal to log in to the portal.
-
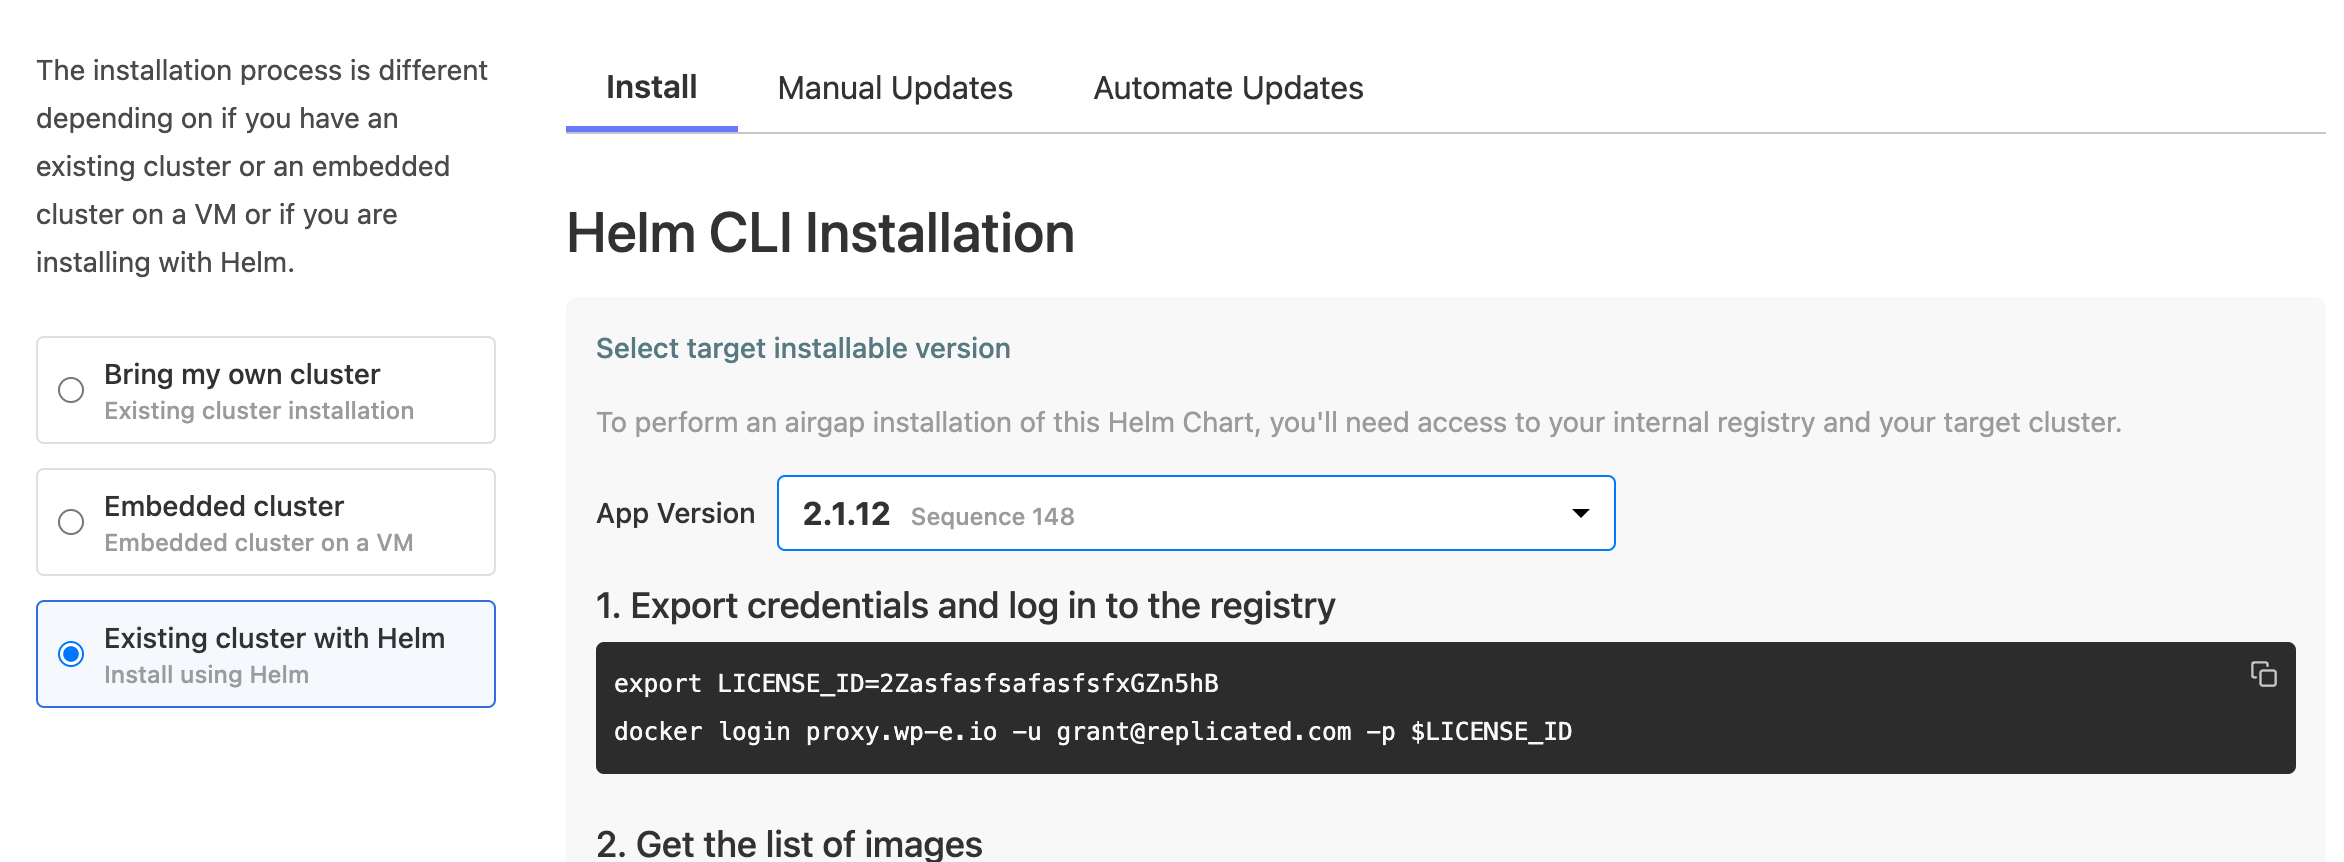
In the Download Portal left nav, click Existing cluster with Helm.
-
On the Install tab, in the App version dropdown, select the target application version to install.
-
Run the first command to authenticate into the Replicated proxy registry with the customer's credentials (the
license_id). -
Under Get the list of images, run the command provided to generate the list of images needed to install.
-
For (Optional) Specify registry URI, provide the URI for an internal image registry where you want to push images. If a registry URI is provided, Replicatd automatically updates the commands for tagging and pushing images with the URI.
-
For Pull, tag, and push each image to your private registry, copy and paste the docker commands provided to pull, tag, and push each image to your internal registry.
noteIf you did not provide a URI in the previous step, ensure that you manually replace the image names in the
tagandpushcommands with the target registry URI. -
Run the command to authenticate into the OCI registry that contains your Helm chart.
-
Run the command to install the
preflightplugin. This allows you to run preflight checks before installing to ensure that the installation environment meets the requirements for the application. -
For Download a copy of the values.yaml file and Edit the values.yaml file, run the
helm show valuescommand provided to download the values file for the Helm chart. Then, edit the values file as needed to customize the configuration of the given chart.If you are installing a release that contains multiple Helm charts, repeat these steps to download and edit each values file.
noteFor installations with mutliple charts where two or more of the top-level charts in the release use the same name, ensure that each values file has a unique name to avoid installation error. For more information, see Installation Fails for Release With Multiple Helm Charts in Troubleshooting Helm Installations.
-
For Determine install method, select one of the options depending on your ability to access the internet and the cluster from your workstation.
-
Use the commands provided and the values file or files that you edited to run preflight checks and then install the release.
Perform updates
This section describes the processes of performing manual and automatic updates with Helm in air gap environments using the instructions provided in the Enterprise Portal or the Download Portal.
Manual updates
The manual update instructions provided in the Enterprise Portal or Download Portal are similar to the installation instructions.
However, the first step prompts the customer to select their current version an the target version to install. This step takes required releases into consideration, thereby guiding the customer to the versions that are upgradable from their current version.
The additional steps are consistent with installation process until the preflight and install commands where customers provide the existing values from the cluster with the helm get values command. Your customer will then need to edit the values.yaml to reference the new image tags.
If the new version introduces new images or other values, Replicated recommends that you explain this at the top of your release notes so that customers know they will need to make additional edits to the values.yaml before installing.
Automate updates (Download Portal only)
The instructions in the Download Portal for automating updates use API endpoints that your customers can automate against.
The instructions provide customers with example commands that can be put into a script that they run periodically (nightly, weekly) using GitHub Actions, Jenkins, or other platforms.
This method assumes that the customer has already done a successful manual installation, including the configuration of the appropriate values.
After logging into the registry, the customer exports their current version and uses that to query an endpoint that provides the latest installable version number (either the next required release, or the latest release) and export it as the target version. With the target version, they can now query an API for the list of images.
With the list of images the provided bash script will automate the process of pulling updated images from the repository, tagging them with a name for an internal registry, and then pushing the newly tagged images to their internal registry.
Unless the customer has set up the values to preserve the updated tag (for example, by using the latest tag), they need to edit the values.yaml to reference the new image tags. After doing so, they can log in to the OCI registry and perform the commands to install the updated chart.
Use a Harbor or Artifactory registry proxy
You can integrate the Replicated proxy registry with an existing Harbor or jFrog Artifactory instance to proxy and cache images on demand. For more information, see Using a Registry Proxy for Helm Air Gap Installations.